Linux 安装 Redis
Linux 安装 Redis
一、下载 Redis 安装程序包
1.1 下载安装包
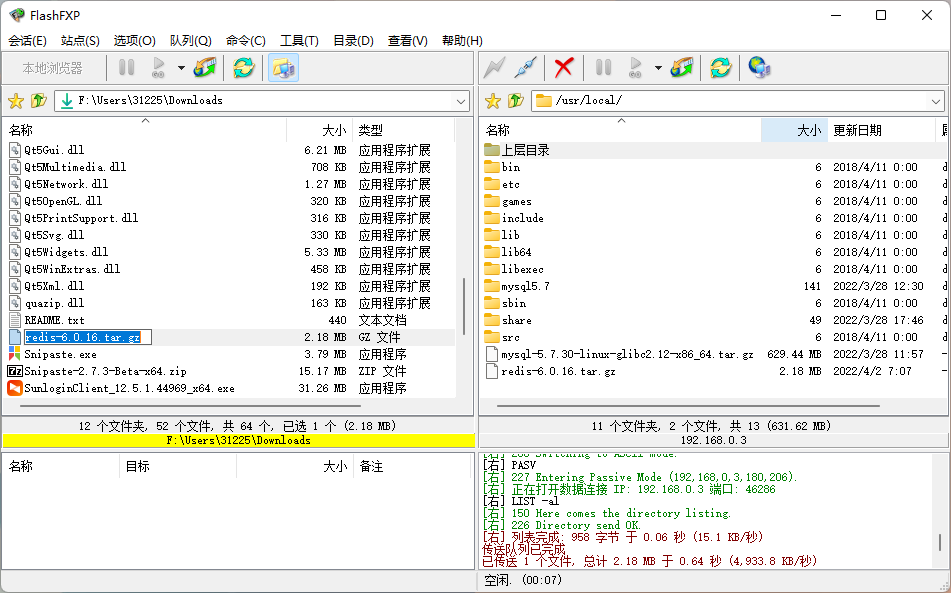
1.2 通过 ftp 工具上传到 linux

查看文件:ls
cd /usr/local

ls
解压文件:
tar -zxvf redis-6.0.16.tar.gz二、安装
2.1 环境安装
Redis 是 C 语言开发,安装 Redis 需要先将 Redis 的源码进行编译,编译依赖 gcc 环境。因此需要安装 GCC,安装过程中有提示时,输入 Y 即可。(make 命令必须在 Redis 程序目录下执行)
查看安装版本:
 [root@localhost local]# gcc -v
 -bash: gcc: 未找到命令
说明未安装,安装命令
yum install gcc-c++ =======================================================================================================
Package 架构 版本 源 大小
=======================================================================================================
正在安装:
gcc-c++ x86_64 4.8.5-44.el7 base 7.2 M
为依赖而安装:
cpp x86_64 4.8.5-44.el7 base 5.9 M
gcc x86_64 4.8.5-44.el7 base 16 M
glibc-devel x86_64 2.17-325.el7_9 updates 1.1 M
glibc-headers x86_64 2.17-325.el7_9 updates 691 k
kernel-headers x86_64 3.10.0-1160.59.1.el7 updates 9.1 M
libmpc x86_64 1.0.1-3.el7 base 51 k
libstdc++-devel x86_64 4.8.5-44.el7 base 1.5 M
mpfr x86_64 3.1.1-4.el7 base 203 k
为依赖而更新:
glibc x86_64 2.17-325.el7_9 updates 3.6 M
glibc-common x86_64 2.17-325.el7_9 updates 12 M
事务概要
=======================================================================================================
安装 1 软件包 (+8 依赖软件包)
升级 ( 2 依赖软件包)
总下载量:57 M
Is this ok [y/d/N]: y输入 y 之后继续安装,直到显示如下安装成功
 已安装:
   gcc-c++.x86_64 0:4.8.5-44.el7

 作为依赖被安装:
   cpp.x86_64 0:4.8.5-44.el7                             gcc.x86_64 0:4.8.5-44.el7
   glibc-devel.x86_64 0:2.17-325.el7_9                   glibc-headers.x86_64 0:2.17-325.el7_9
   kernel-headers.x86_64 0:3.10.0-1160.59.1.el7          libmpc.x86_64 0:1.0.1-3.el7
   libstdc++-devel.x86_64 0:4.8.5-44.el7                 mpfr.x86_64 0:3.1.1-4.el7

 作为依赖被升级:
   glibc.x86_64 0:2.17-325.el7_9                  glibc-common.x86_64 0:2.17-325.el7_9

 完毕!
 [root@localhost local]#
可以看到安装版本是 4.8.5 的,需要升级到 5.3 版本以上,才可以支持 redis6.0
CentOS7 安装有默认 GCC 环境,默认 4.8.5 版本!编译 redis-6.x,要求 C5.3 以上 编译器,否则会遇到大量的错误。主要原因是从 redis-6.x 开始的多线程代码依赖 C 标准库中的新增类型 _Atomic 。但是注意 gcc 从 4.9 版本才开始正式和完整地支持 stdatomic(gcc-4.8.5 部分支持)。centos7 默认的 gcc 版本为:4.8.5 < 5.3 无法编译
常见错误如下图:原因是因为 gcc 版本过低,yum 安装的 gcc 是 4.8.5 的。因此需要升级 gcc。升级 gcc 到 5.3 以上版本。(如果没有此错误忽略不计)

2.2 升级 GCC 环境
清除已编译生成的文件 (本次未编译,忽略这一步)
 # 当Redis编译出错时,使用命令清除已编译生成的文件(未编译可忽略)
 make  distclean
升级 GCC 环境为 9 版本
 yum  -y  install  centos-release-scl
 yum  -y  install  devtoolset-9-gcc  devtoolset-9-gcc-c++  devtoolset-9-binutils
升级成功后我们运行 gcc -v 会发现版本还是 4.8.5,这时候要执行命令设置环境
scl enable devtoolset-9 bash但是要注意这个设置只是临时有效的,一旦我们退出 shell 或者重启就会恢复原来的 4.8.5 版本,所以要设置成长期有效
echo "source /opt/rh/devtoolset-9/enable" >>/etc/profile2.3 Redis 安装
参考官网安装说明!
进入 Redis 程序目录:
cd /usr/local/redis-6.0.16编译 Redis 程序:
makeCC setcpuaffinity.o CC mt19937-64.o LINK redis-server INSTALL redis-sentinel CC redis-cli.o LINK redis-cli CC redis-benchmark.o LINK redis-benchmark INSTALL redis-check-rdb INSTALL redis-check-aof Hint: It's a good idea to run 'make test' ;) make[1]: 离开目录“/usr/local/redis-6.0.16/src” [root@localhost redis-6.0.16]#安装 Redis 到指定目录:
make install PREFIX\=/usr/local/redis-6.0.16INSTALL install INSTALL install INSTALL install INSTALL install INSTALL install make[1]: 离开目录“/usr/local/redis-6.0.16/src” [root@localhost redis-6.0.16]#进入 bin 目录:查看安装的 Redis 命令:
[root@localhost redis-6.0.16]# cd bin
[root@localhost bin]# ls
redis-benchmark  redis-check-aof  redis-check-rdb  redis-cli  redis-sentinel  redis-server
[root@localhost bin]#
2.4 Redis 配置
执行命令:
mkdir -p /usr/local/redis-6.2.14/bin/conf/创建 conf 目录用于存放配置文件,执行命令复制 Redis 程序目录中的配置文件放入到 redis 命令所在 conf 目录中:
cp /usr/local/redis-6.0.16/redis.conf /usr/local/redis-6.0.16/bin/conf/三、Redis 启动测试
进入 Redis 安装目录 bin:
cd /usr/local/redis-6.2.14/bin使用命令启动 Redis 服务(测试 Redis 服务会占用一个窗口):
./redis-server conf/redis.conf[root@localhost bin]# ./redis-server conf/redis.conf
6466:C 02 Apr 2022 15:54:29.016 # oO0OoO0OoO0Oo Redis is starting oO0OoO0OoO0Oo
6466:C 02 Apr 2022 15:54:29.016 # Redis version=6.0.16, bits=64, commit=00000000, modified=0, pid=6466, just started
6466:C 02 Apr 2022 15:54:29.016 # Configuration loaded
6466:M 02 Apr 2022 15:54:29.017 * Increased maximum number of open files to 10032 (it was originally set to 1024).
_._
_.-``__ ''-._
_.-`` `. `_. ''-._ Redis 6.0.16 (00000000/0) 64 bit
.-`` .-```. ```\/ _.,_ ''-._
( ' , .-` | `, ) Running in standalone mode
|`-._`-...-` __...-.``-._|'` _.-'| Port: 6379
| `-._ `._ / _.-' | PID: 6466
`-._ `-._ `-./ _.-' _.-'
|`-._`-._ `-.__.-' _.-'_.-'|
| `-._`-._ _.-'_.-' | http://redis.io
`-._ `-._`-.__.-'_.-' _.-'
|`-._`-._ `-.__.-' _.-'_.-'|
| `-._`-._ _.-'_.-' |
`-._ `-._`-.__.-'_.-' _.-'
`-._ `-.__.-' _.-'
`-._ _.-'
`-.__.-'新开一个连接窗口,启动客户端连接 redis 服务器:
#进入reids命令目录
[root@localhost ~]# cd /usr/local/redis-6.0.16/bin/

#启动客户端连接服务器:并指定端口
[root@localhost bin]# ./redis-cli -p  6379

#测试连接
127.0.0.1:6379> ping

PONG

#停止Redis服务,并断开连接
127.0.0.1:6379> shutdown

not connected> exit  # 退出redis
[root@localhost bin]#
四、配置 Redis 为后台启动
以上的 Redis 安装和启动可以算是临时服务,当开启服务后,Redis 服务窗口是无法在使用的,可以将 Redis 服务设置为后台启动服务,避免 Linux 窗口连接的浪费。
开启 Redis 后台服务(默认是关闭的)步骤如下:
编辑配置文件
vim /usr/local/redis-6.0.16/bin/conf/redis.conf(文件比较长,键入命令 :set nu 显示行号)
在 vi 界面命令行模式下输入
/daemonize no进行查找找到 daemonize no ,大约在 200 多行
输入 i 进入插入模式
将 daemonize no 改成 daemonize yes(表示开启 redis 后台服务)
按 ESC 退出插入模式,输入:wq 保存退出
测试效果:
./redis-server conf/redis.conf

./redis-cli -p 6379

127.0.0.1:6379> ping
PONG

127.0.0.1:6379> shutdown
not connected> exit
查看 Redis 服务进程:
ps -ef | grep redisRedis 的关闭:
./redis-cli -p 6379    ##启动客户端连接Redis服务

127.0.0.1:6379> ping
PONG

127.0.0.1:6379> shutdown      ##关闭服务端连接
not connected> exit         ##退出

#或者
pkill redis    #结束Redis进程
如需外部访问 redis,进入配置文件,在 bin 目录下:
vim conf/redis.conf约 60 多行,把 bind 127.0.0.1 注释掉,约 80 多行,把 protected-mode yes 改为 no,然后重启 Redis
五、配置 redis 开机启动
在 etc 目录下新建文件夹:
cd /etc
mkdir redis
复制配置文件将 redis.conf 文件复制到/etc/redis 目录下,并重命名为 6379.conf
cp /usr/local/redis-6.0.16/bin/conf/redis.conf /etc/redis/6379.conf复制启动脚本:
cp /usr/local/redis-6.0.16/utils/redis_init_script /etc/init.d/redis查看启动脚本
vim /etc/init.d/redis #查看启动脚本确定启动命令路径是否正确#!/bin/sh
#
# Simple Redis init.d script conceived to work on Linux systems
# as it does use of the /proc filesystem.
### BEGIN INIT INFO
# Provides: redis_6379
# Default-Start: 2 3 4 5
# Default-Stop: 0 1 6
# Short-Description: Redis data structure server
# Description: Redis data structure server. See https://redis.io
### END INIT INFO
REDISPORT=6379
EXEC=/usr/local/bin/redis-server
CLIEXEC=/usr/local/bin/redis-cli
PIDFILE=/var/run/redis_${REDISPORT}.pid
CONF="/etc/redis/${REDISPORT}.conf"将启动脚本中的路径修改:
EXEC=/usr/local/redis-6.0.16/bin/redis-server
CLIEXEC=/usr/local/redis-6.0.16/bin/redis-cli
执行自启命令:
cd /etc/init.d
chkconfig redis on如果运行结果提示:service redisd does not support chkconfig,解决方法: 使用 vim 编辑 redisd 文件,在第一行加入如下两行注释,保存退出,再次执行自启命令即可 # chkconfig: 2345 90 10# description: Redis is a persistent key-value database 注释的意思是,redis 服务必须在运行级 2,3,4,5 下被启动或关闭,启动的优先级是 90,关闭的优先级是 10。
现在你可以使用以下命令来验证 Redis 服务是否已经启用并设置为自动启动:
systemctl is-enabled redis.service如果输出显示为 enabled,则表示 Redis 服务已经设置为自动启动。如果输出为 disabled,则表示可能出现了错误,请尝试重新执行 chkconfig redis on 命令。
启动 redis
# 打开redis命令:
service redis start

# 关闭redis命令:
service redis stop

# 查看状态
systemctl status redis

# 重启
systemctl restart redis.service
六、卸载
删除 Redis 安装和 Redis 解压的文件即可
#删除安装目录
rm  -rf  /usr/local/redis-6.x/redis-6.0.8
#删除所有redis相关命令脚本
rm  -rf  /usr/local/redis-6.x/bin/redis-*
七、重置 redis 密码
进入 bin 目录,连接到 redis:./redis-cli -p 6379
config set requirepass 123456
config get requirepass
问题
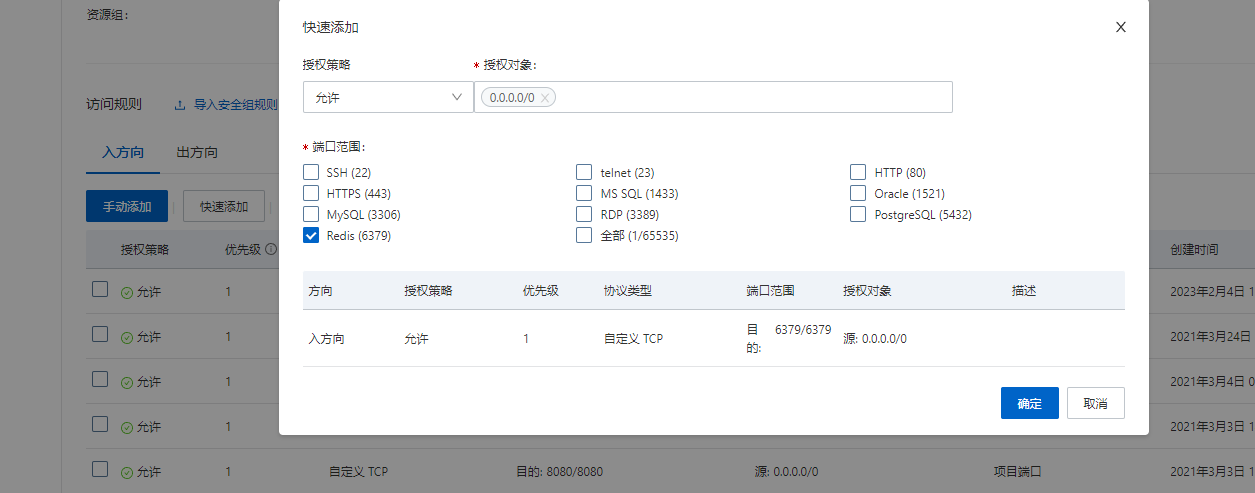
1.外部访问不了阿里云服务器部署的 redis
为 redis 新增安全策略
实例 -- 安全组 -- 点击安全组 id
快速添加

