VuePress 搭建个人网站全流程
VuePress 搭建个人网站全流程
依赖环境
- Node.js v18.16.0+
- 包管理器,如 pnpm、yarn、npm 等。
参考文档:运行环境设置 | vuepress-theme-hope (vuejs.press)
一、创建本地模板项目
这里直接选择一个比较友好的 vuepress 主题 vuepress-theme-hope,官方文档:快速上手 | vuepress-theme-hope (vuejs.press)
1.1 创建项目
选择项目位置,建议在纯英文目录下。在该目录下右键“在终端中打开”,使用命令创建一个该主题的项目模板:
pnpm create vuepress-theme-hope my-docs创建过程中需要在命令窗口进行一些设置,可以参考如下设置:
- 选择显示语言:简体中文
- 选择包管理器:pnpm
- 你想要使用哪个打包器:vite
- 设置应用名称:my-blog
- 设置应用描述:my-blog
- 设置应用版本号:直接回车
- 设置协议:直接回车
- 你想要创建什么类型的项目:blog
- 项目需要用到多语言么:n
- 是否初始化 git 仓库:n (选择 y 遇到过一个报错,导致项目没有初始化成功)
- 是否想要现在启动 Demo 查看:n
1.2 打包工具以及常用命令
安装打包工具 vite:
pnpm add -D vuepress@next @vuepress/bundler-vite@next打包命令:
pnpm docs:build启动开发服务器:
pnpm docs:dev二、部署到 Vercel
2.1 Github
到 github 上新建一个空的仓库 my-blog,设置为私有。
在本地项目根目录执行命令关联到远程仓库:
git init
git remote add origin https://github.com/Dustin-CC/my-blog.git
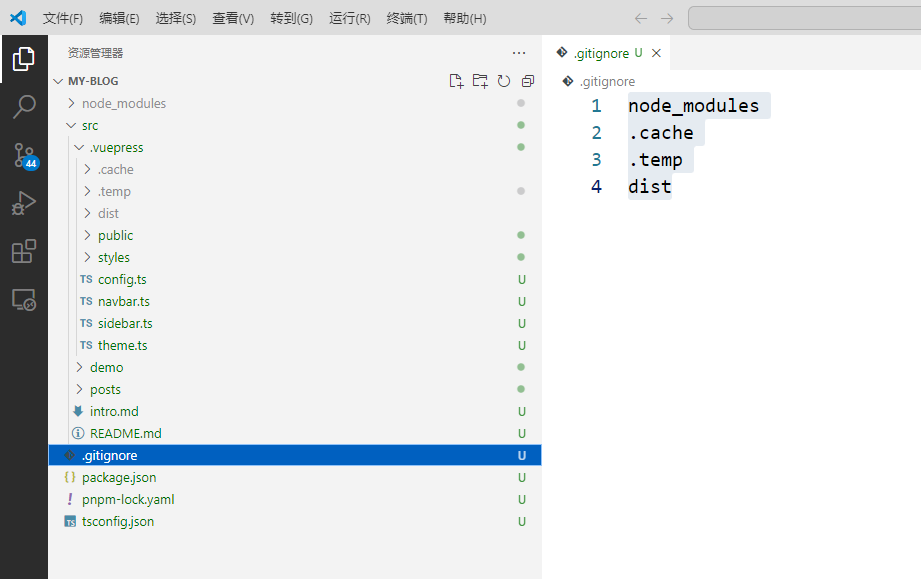
在根目录新建 .gitignore 文件,配置如下内容:
node_modules
.cache
.temp
dist
项目结构如下所示:
在根目录执行以下命令,将代码提交并首次推送到 github:
git add .
git commit -m "初始化模板"
git push --set-upstream origin master
2.2 Vercel
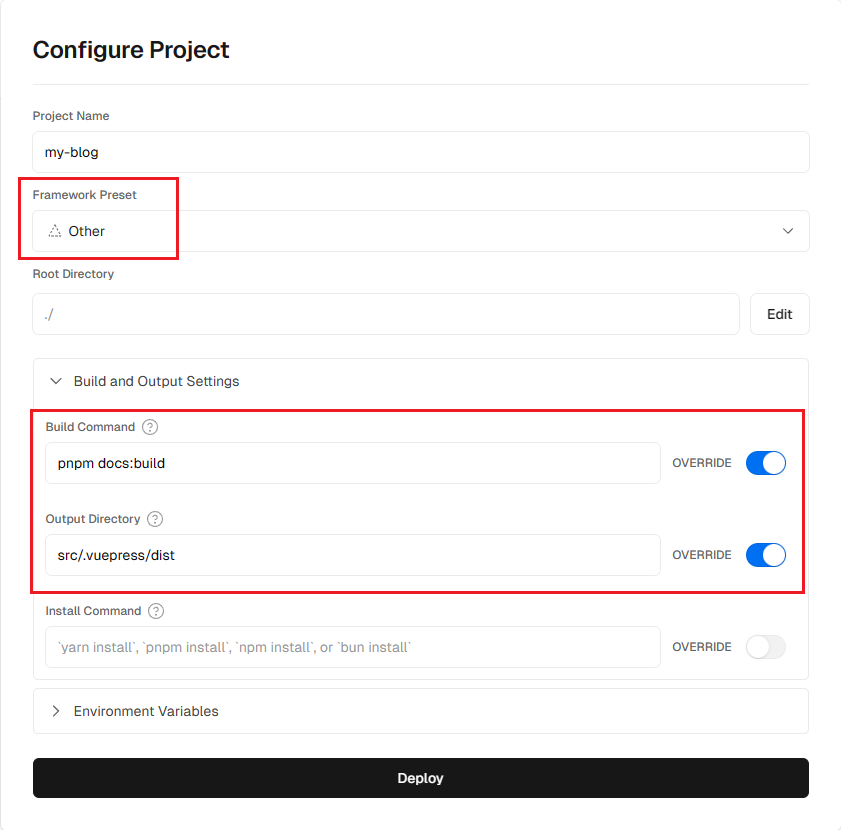
登录 Vercel,点击 Add new ,新建一个项目,导入上面创建的 github 仓库,并进行如下配置
- Framework Preset: 选择 Other
- Build Command: pnpm docs:build
- Output Directory: src/.vuepress/dist
参考图片如下:
点击 Deploy 按钮,等待一两分钟部署成功即可(会撒花 😂)。
2.3 绑定自己的域名
因为 Vercel 在国内被墙,所以提供的域名国内无法访问,可以通过绑定自己的域名来解决。
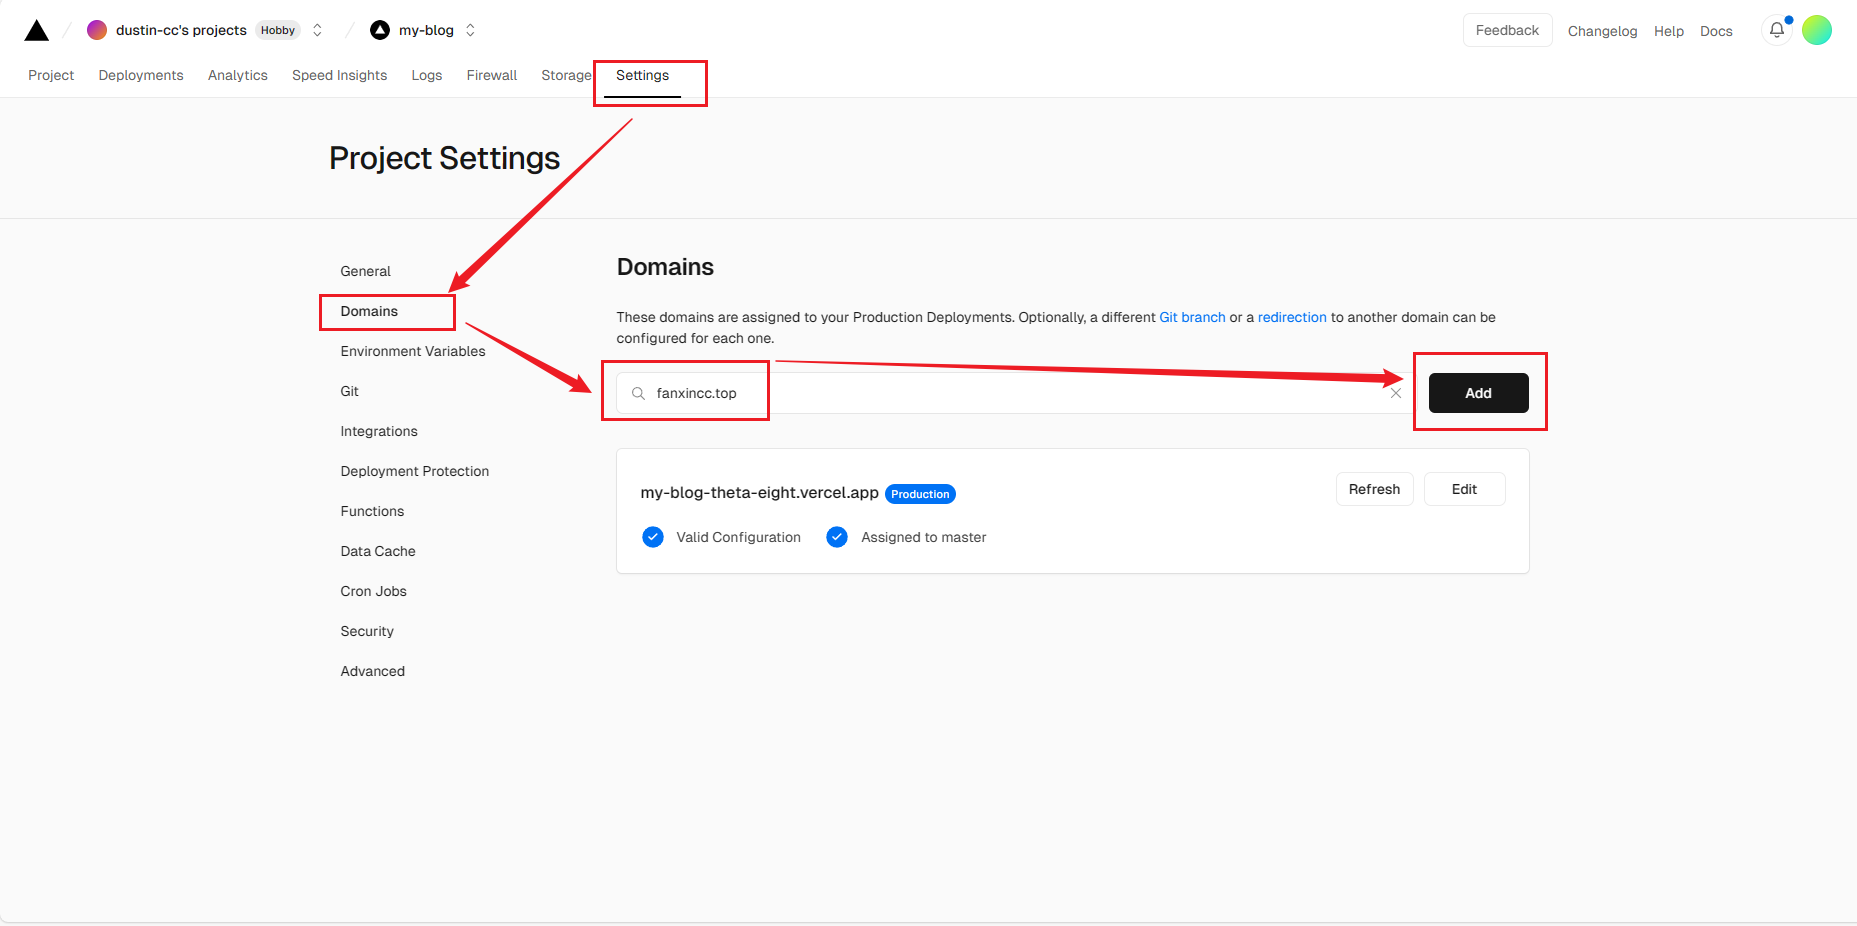
进入 Vercel 项目,点击 Settings - Domains,输入自己的二级域名,点击 Add,如下图:
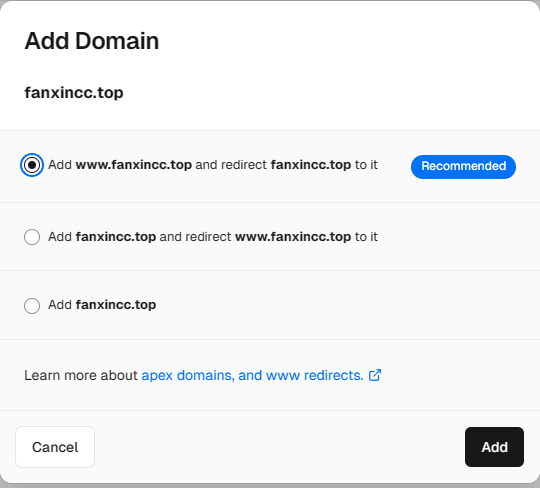
然后弹框选择域名重定向设置,按推荐配置就可以,再次点击 Add。
此时会提示 Invalid Configuration,如下图:
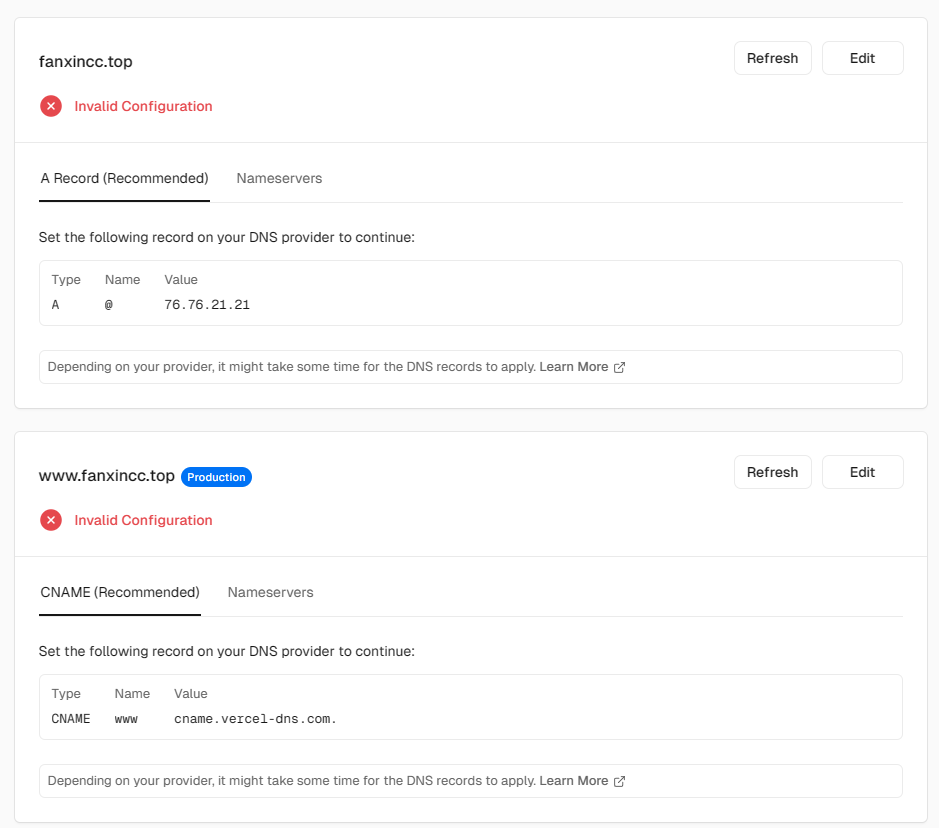
代表需要进行域名解析,以阿里云为例:
阿里云域名列表 - 点击解析 - 添加记录。
按照 Vercel 给出的提示配置记录,Type 对应记录类型,Name 对应 主机记录,Value 对应记录值。如下:
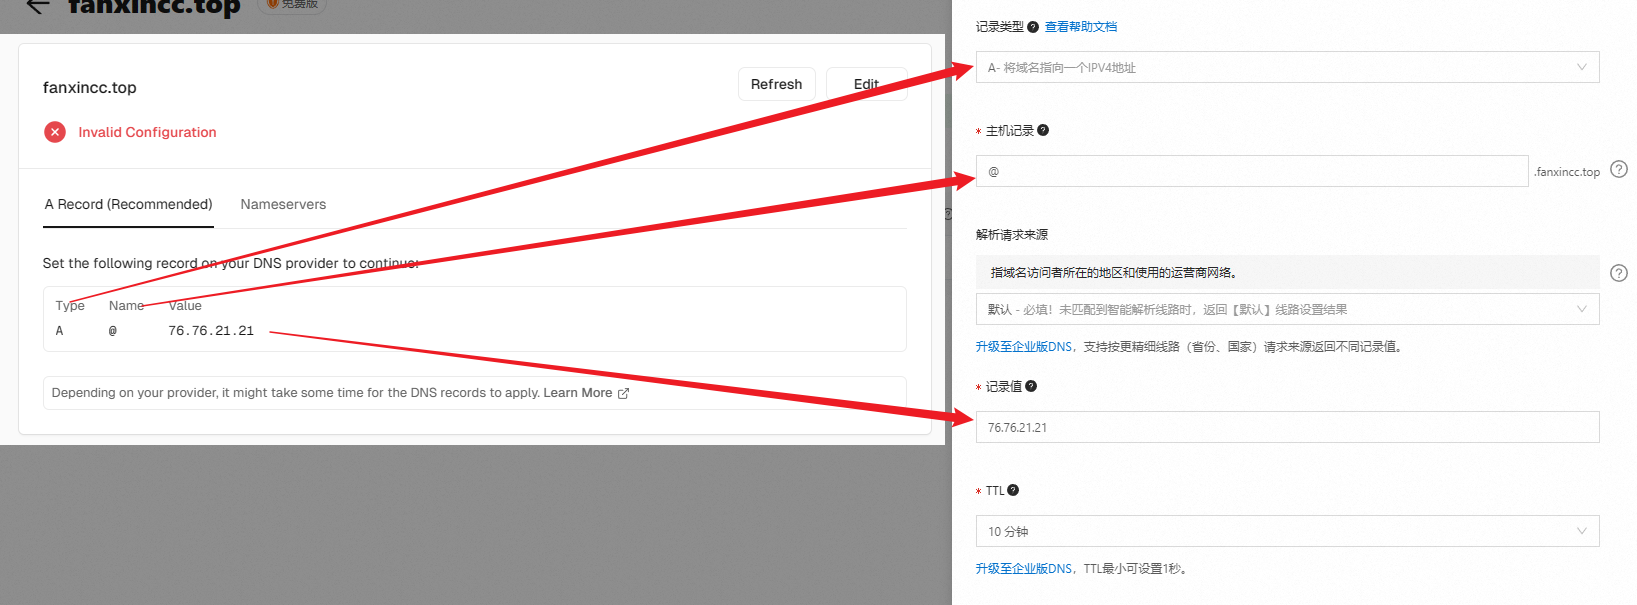
点击确认,同样按照 Vercel 给出的提示配置另外一条记录。
然后回到 vercel,看到下图证明配置成功,可以进行域名访问:

注:不需要给自定义域名单独配置 SSL 证书,Vercel 会生成。
三、自定义博客
3.1 导航栏
- 修改文件
.vuepress/config.ts 中的titledescription - 修改文件
.vuepress/navbar.ts
3.2 logo
- 修改文件
theme.ts 中的logo - 修改文件
README.md 中的heroImage
3.3 主页背景
修改文件 README.md ,配置 bgImage 为图片的路径,如 /bg.jpg,对应的图片路径为 .vuepress/public/bg.jpg
3.4 博主信息
在 .vuepress/theme.ts 文件中,主要修改的字段为:
- hostname:网站部署域名
- author:作者信息
- logo:网站 logo
- favicon:网页图标
- repo:github 仓库
- blog:博主信息
3.5 个人介绍页
修改文件 intro.md
3.6 页脚
- 主页页脚:
README.md 中的footer - 全局页脚:
theme.ts 中的footer ,支持 HTML
3.7 左侧边栏
修改文件 .vuepress/sidebar.ts
3.8 搜索框
参考文档:搜索 | vuepress-theme-hope (vuejs.press)
最简单的 search 插件不支持全文搜索,searchPro 插件有 bug,选择 DocSearch 插件,就是样式有点丑,回头优化一下(已优化:3.12.2 美化 DocSearch 搜索)。
3.8.1 申请一个免费服务
我们可以通过提供自己的域名、邮箱,来申请一个官方的免费服务,省去自己部署爬虫。
打开网址: DocSearch: Search made for documentation | DocSearch by Algolia
填写自己的域名、邮箱,勾选所有选项,点击按钮 Join the program,如下图:
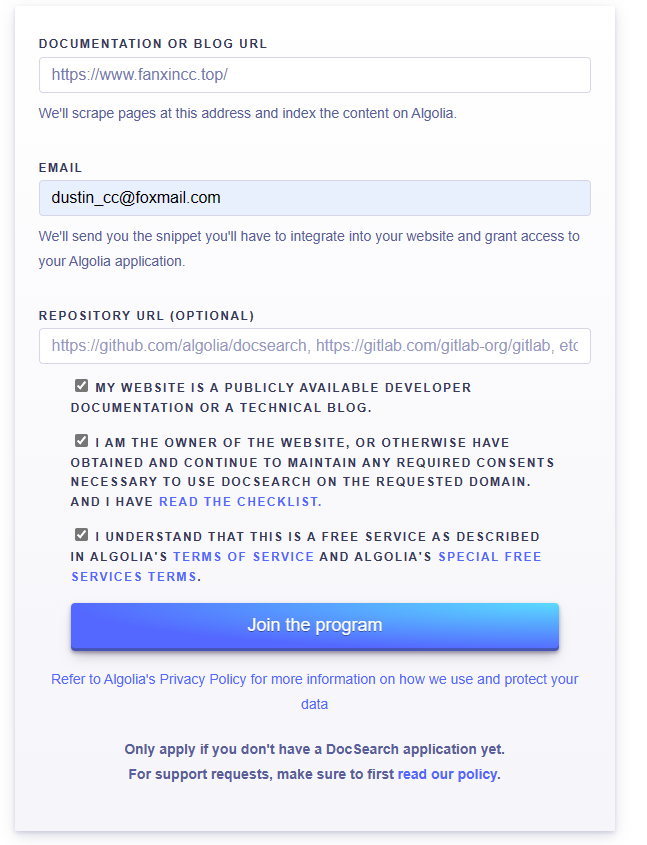
会收到两封邮件,第一封是表明收到申请,第二封是表明搜索已经准备好,并提供了 appKey。收到第二封邮件后,将 appId, apiKey, indexName 配置到 .vuepress/theme.ts 文件中,配置参考如下:

因为使用的主题不是 VuePress 的默认主题,这个时候应该无法搜索到结果,需要调整一下官方默认的爬虫配置。
3.8.2 进入 DocSearch 后台
点击邮件中提供的邀请链接,并注册登录,进入到 algolia 的 dashboard,会收到邀请提示,如:has invited you to join application xxx ,点击 Accept 即可。
接受后,点击 Application ,选择对应的项目即可进入管理后台。
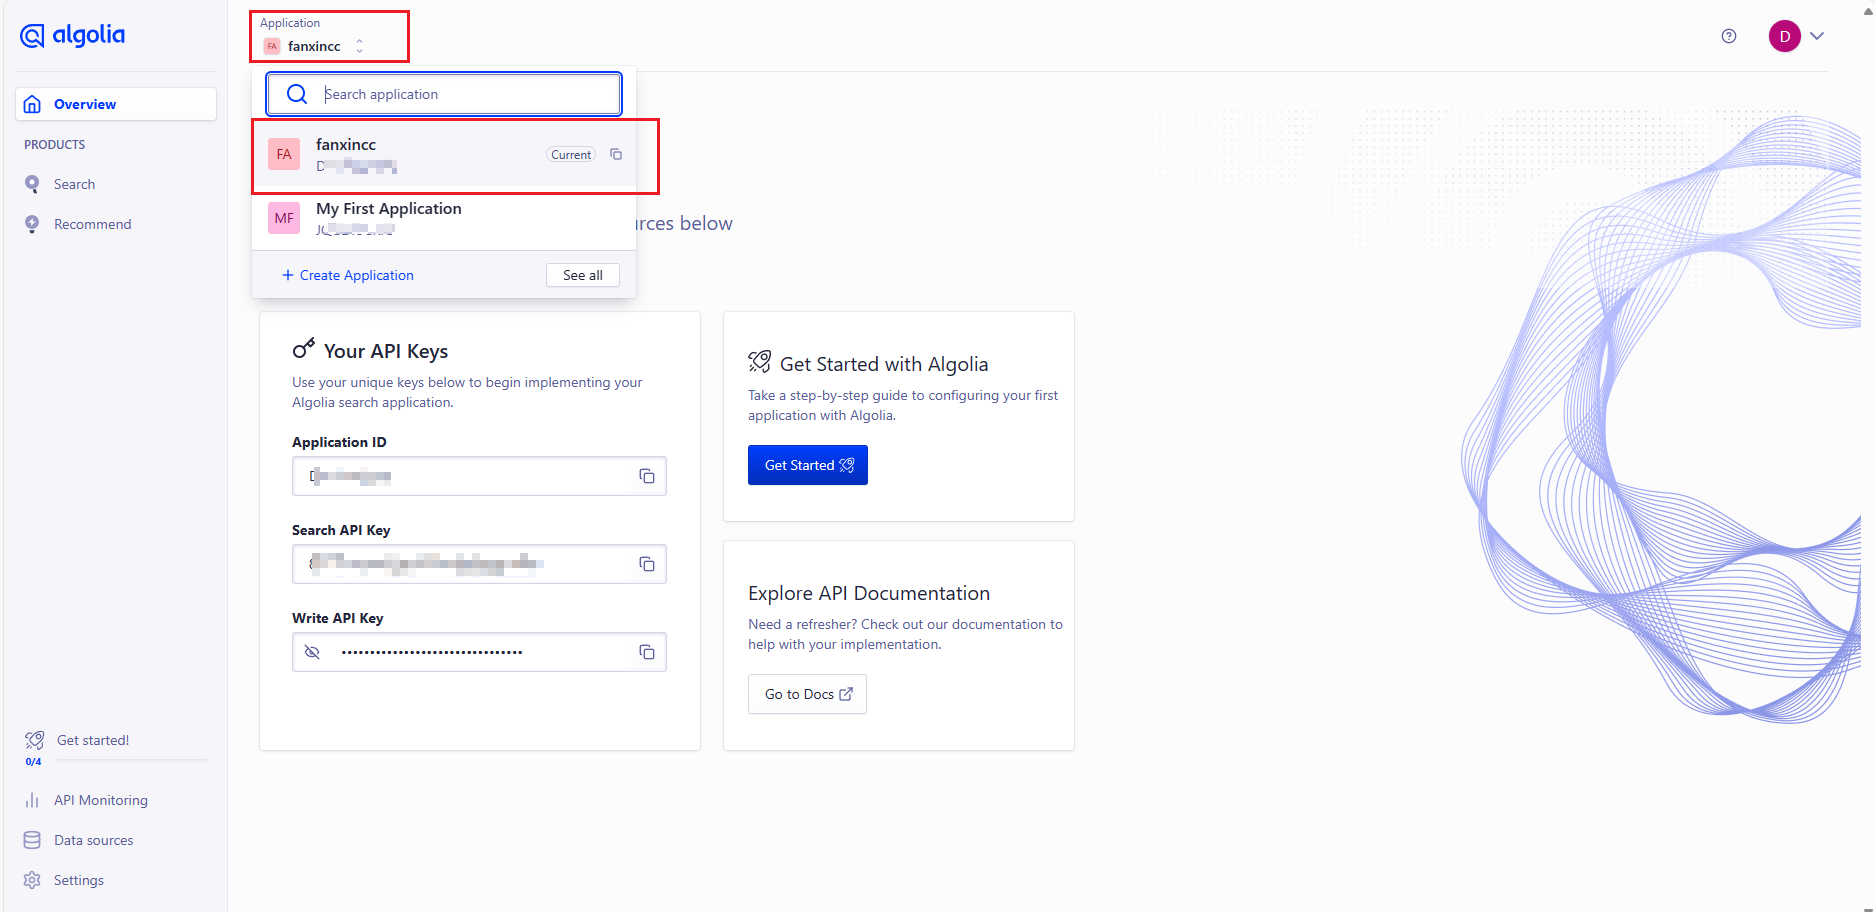
3.8.3 修改爬虫配置
访问爬虫管理后台:Algolia Crawler
点击名称进入爬虫的详细界面:
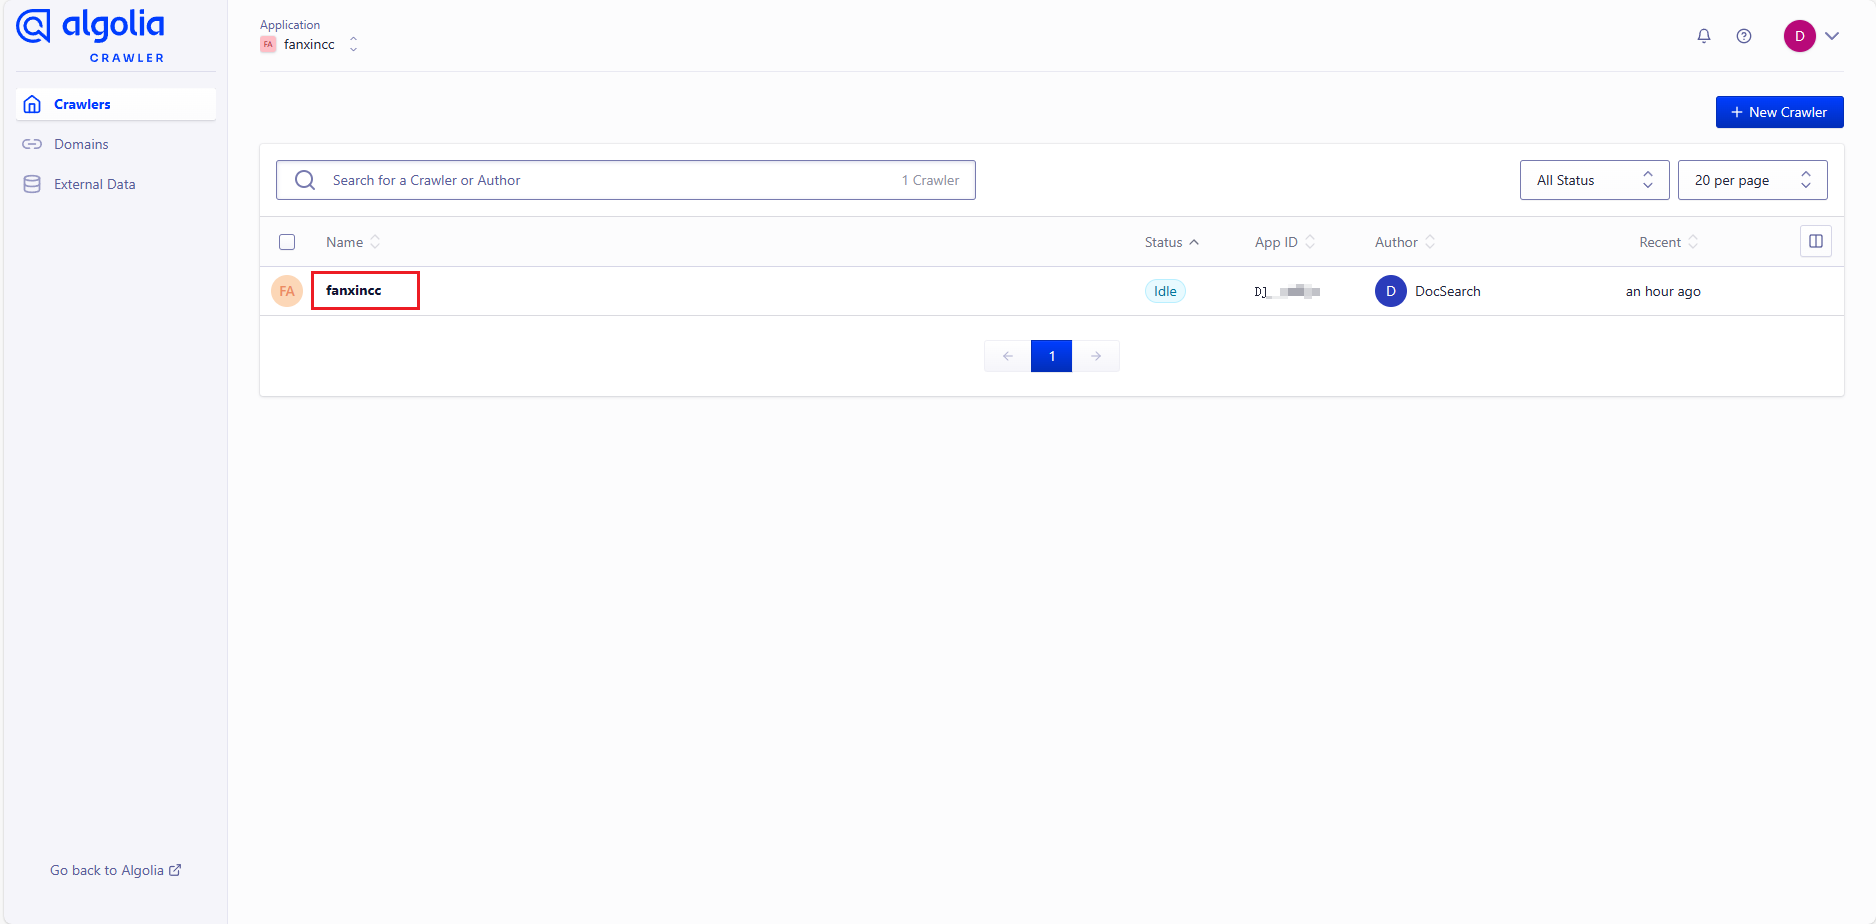
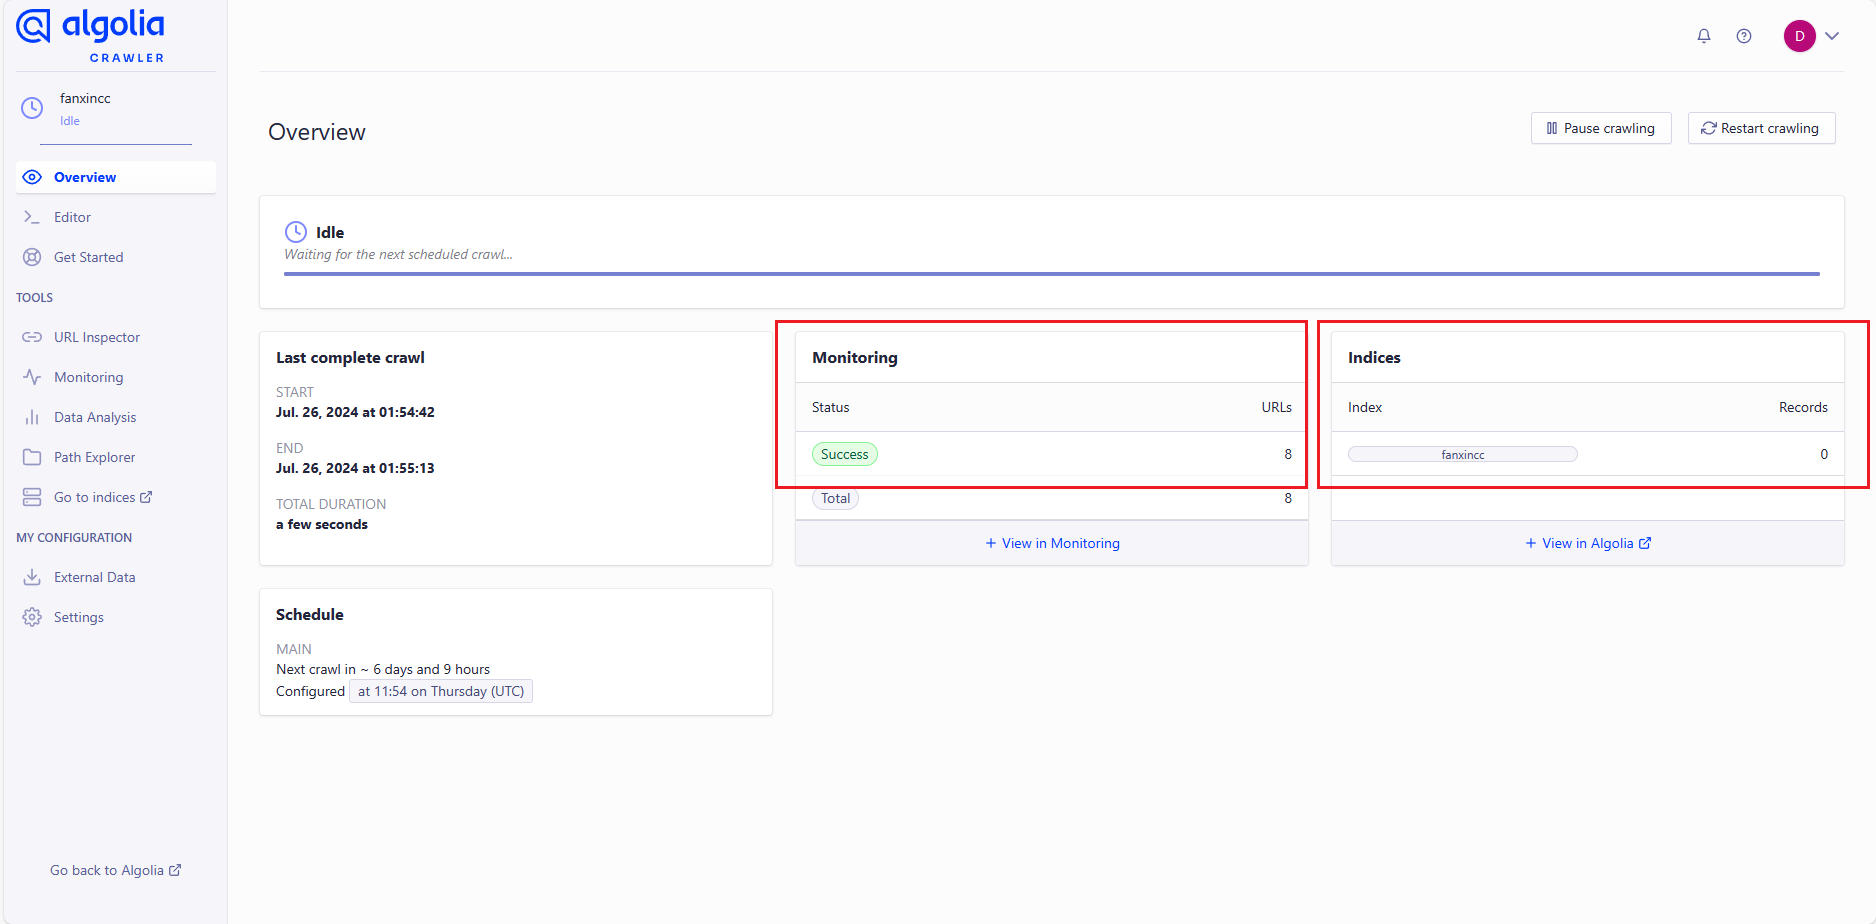
在 Overview 界面可以看到 Monitoring 的状态为 Success,但是索引 Indices 的数量为 0,如下图:
点击左侧边栏 Editor 进入爬虫的编辑页面,可以看到左侧的编辑器中是【官方配置的爬虫代码】 。全选代码,复制到本地文件用于备份,然后将以下代码粘贴到官方编辑器中(本代码来自搜索 | vuepress-theme-hope (vuejs.press)):
new Crawler({
  appId: "YOUR_APP_ID",   // 改为自己的 appId
  apiKey: "YOUR_API_KEY", // 改为自己的 apiKey,来源于 【官方配置的爬虫代码】!!不是邮件里的apiKey!!
  rateLimit: 8,
  startUrls: [
    "https://YOUR_WEBSITE_URL",  // 改为自己网站,如:"https://www.fanxincc.top"
  ],
  sitemaps: [
    "https://YOUR_WEBSITE_URL/sitemap.xml", // 改为自己网站,如:"https://www.fanxincc.top/sitemap.xml"
  ],
  ignoreCanonicalTo: false,
  discoveryPatterns: [
    "https://YOUR_WEBSITE_URL/**",  // 改为自己网站,如:"https://www.fanxincc.top/**"
  ],
  // 爬虫执行的计划时间,可根据文档更新频率设置
  schedule: "at 02:00 every 1 day",
  actions: [
    {
      indexName: "YOUR_INDEX_NAME", // 改为自己的索引,如:"fanxincc"
      pathsToMatch: ["https://YOUR_WEBSITE_URL/**"], // 改为自己网站,如:"https://www.fanxincc.top/**"
      recordExtractor: ({ $, helpers }) => {
        // 【以下是适用于 vuepress-theme-hope 的默认选项选项】
        // vuepress-theme-hope 默认的容器类名为 theme-hope-content
        return helpers.docsearch({
          recordProps: {
            lvl0: {
              selectors: [
                ".vp-sidebar-page.active",
                ".theme-hope-content h1",
              ],
              defaultValue: "Documentation",
            },
            lvl1: ".theme-hope-content h1",
            lvl2: ".theme-hope-content h2",
            lvl3: ".theme-hope-content h3",
            lvl4: ".theme-hope-content h4",
            lvl5: ".theme-hope-content h5",
            lvl6: ".theme-hope-content h6",
            content: ".theme-hope-content p, .theme-hope-content li",
          },
          recordVersion: "v3",
        });
      },
    },
  ],
  initialIndexSettings: {
    YOUR_INDEX_NAME: {  // 改为自己的索引,如:fanxincc
      attributesForFaceting: ["type", "lang"],
      attributesToRetrieve: ["hierarchy", "content", "anchor", "url"],
      attributesToHighlight: ["hierarchy", "hierarchy_camel", "content"],
      attributesToSnippet: ["content:10"],
      camelCaseAttributes: ["hierarchy", "hierarchy_radio", "content"],
      searchableAttributes: [
        "unordered(hierarchy_radio_camel.lvl0)",
        "unordered(hierarchy_radio.lvl0)",
        "unordered(hierarchy_radio_camel.lvl1)",
        "unordered(hierarchy_radio.lvl1)",
        "unordered(hierarchy_radio_camel.lvl2)",
        "unordered(hierarchy_radio.lvl2)",
        "unordered(hierarchy_radio_camel.lvl3)",
        "unordered(hierarchy_radio.lvl3)",
        "unordered(hierarchy_radio_camel.lvl4)",
        "unordered(hierarchy_radio.lvl4)",
        "unordered(hierarchy_radio_camel.lvl5)",
        "unordered(hierarchy_radio.lvl5)",
        "unordered(hierarchy_radio_camel.lvl6)",
        "unordered(hierarchy_radio.lvl6)",
        "unordered(hierarchy_camel.lvl0)",
        "unordered(hierarchy.lvl0)",
        "unordered(hierarchy_camel.lvl1)",
        "unordered(hierarchy.lvl1)",
        "unordered(hierarchy_camel.lvl2)",
        "unordered(hierarchy.lvl2)",
        "unordered(hierarchy_camel.lvl3)",
        "unordered(hierarchy.lvl3)",
        "unordered(hierarchy_camel.lvl4)",
        "unordered(hierarchy.lvl4)",
        "unordered(hierarchy_camel.lvl5)",
        "unordered(hierarchy.lvl5)",
        "unordered(hierarchy_camel.lvl6)",
        "unordered(hierarchy.lvl6)",
        "content",
      ],
      distinct: true,
      attributeForDistinct: "url",
      customRanking: [
        "desc(weight.pageRank)",
        "desc(weight.level)",
        "asc(weight.position)",
      ],
      ranking: [
        "words",
        "filters",
        "typo",
        "attribute",
        "proximity",
        "exact",
        "custom",
      ],
      highlightPreTag:
        '<span class="algolia-docsearch-suggestion--highlight">',
      highlightPostTag: "</span>",
      minWordSizefor1Typo: 3,
      minWordSizefor2Typos: 7,
      allowTyposOnNumericTokens: false,
      minProximity: 1,
      ignorePlurals: true,
      advancedSyntax: true,
      attributeCriteriaComputedByMinProximity: true,
      removeWordsIfNoResults: "allOptional",
    },
  },
});
配置好之后我们可以在右侧输入自己的一个文章链接,点击 Run Test:
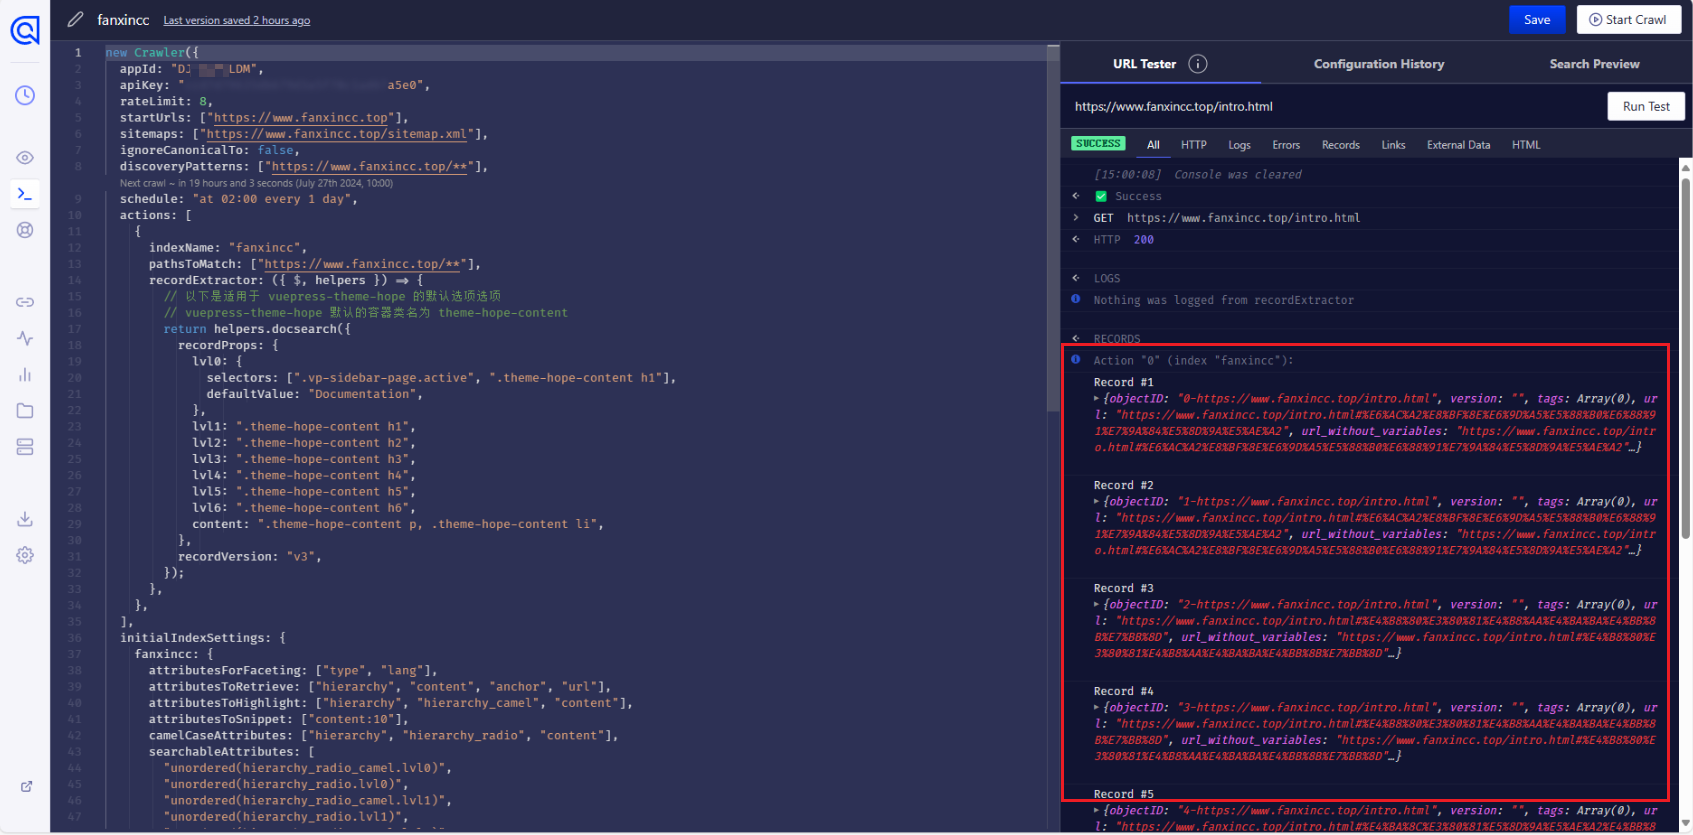
可以看到多条 Record,说明配置成功,然后点击右上角的 Save 保存。
点击左侧边栏的眼睛图标,回到 Overview 页面,点击右边按钮 Restart crawling,等待一会儿即可看到索引数量,如下图:
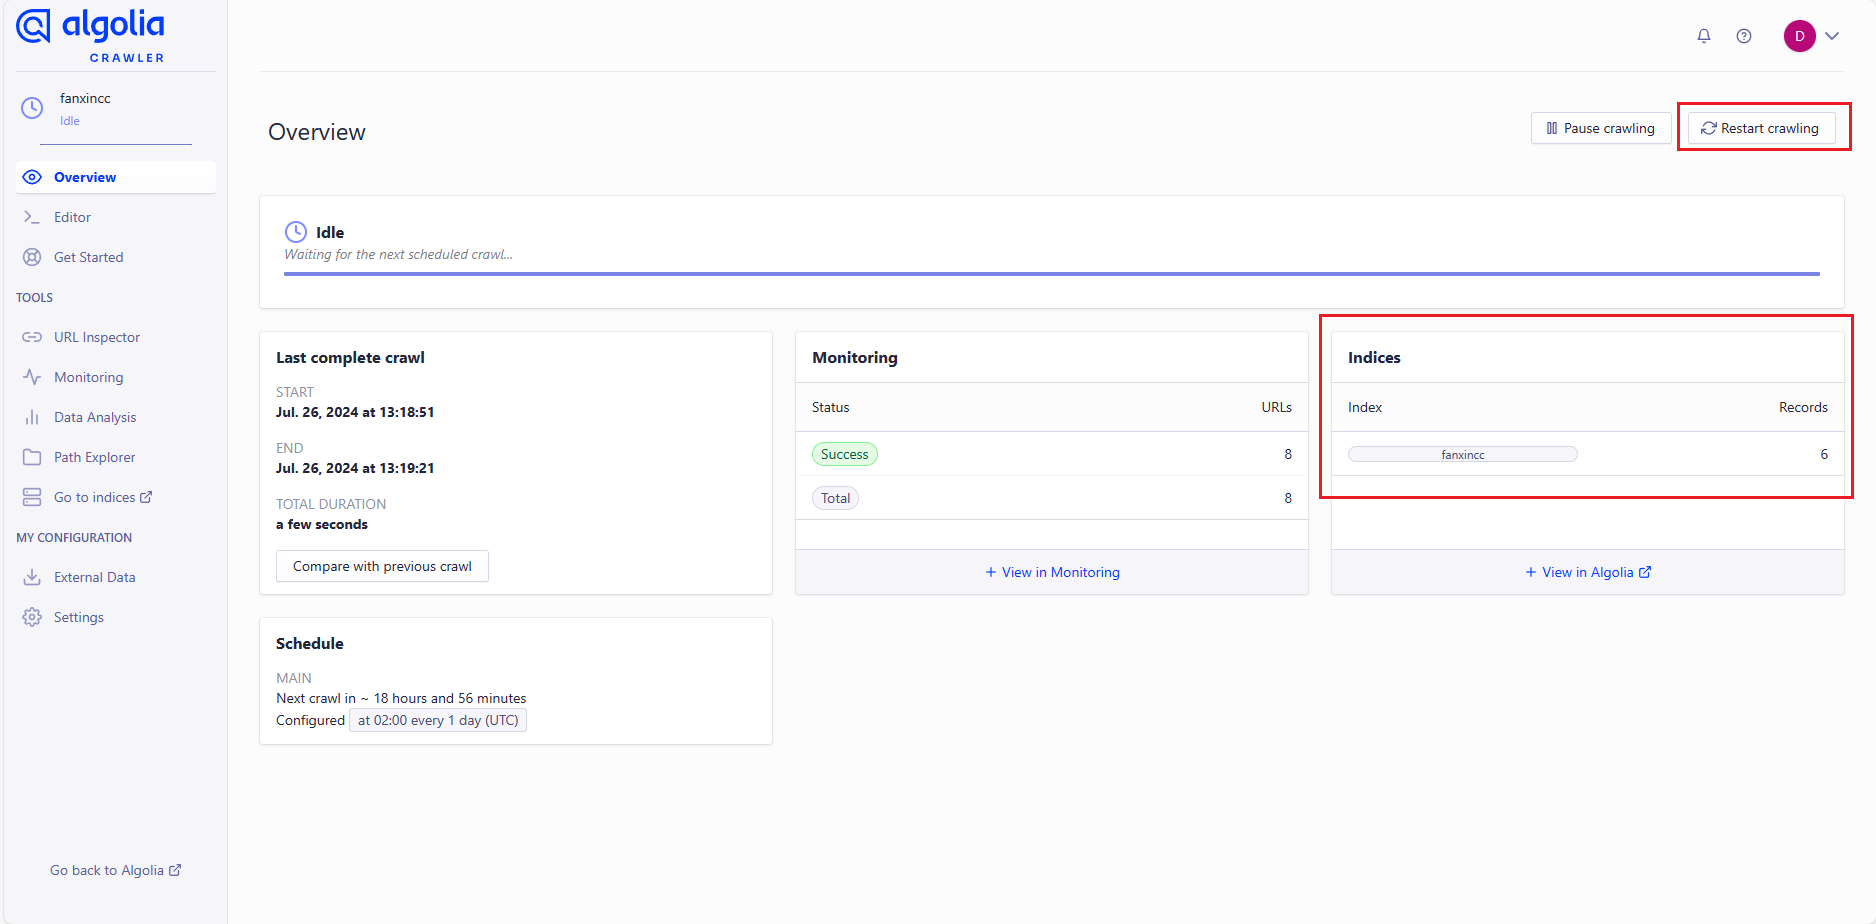
这个时候可以在博客页面进行搜索了。
3.9 评论插件
3.9.1 部署 Waline
使用 LeanCloud 和 Vercel 部署 Waline,并绑定自己的域名,参考文档:
除了使用 LeanCloud,还可以使用 Deta Base 作数据库,Deta 是国外的开发平台,目前给注册开发者提供无限的存储服务,目前其数据托管在亚马逊上,亚马逊在全球有多个节点,国内访问速度很不错。
部署好之后一定记得先访问地址 域名/ui 进行注册,首个注册的人会成为管理员。
可以参考上文给评论系统绑定一个自己的域名,不然用户会因为网络问题无法进行评论:2.3 绑定自己的域名
3.9.2 博客配置 Waline
在 .vuepress/theme.ts 文件的 plugins 配置:
  plugins: {
	// 评论插件
    comment: {
      provider: "Waline",  				 // 必填。评论服务。
      serverURL: "https://xxx.xxx.xxx/", // 必填。Waline 的服务端地址。
      meta: ['nick', 'mail'], 			 // 可选。评论者相关属性。
      requiredMeta: ['nick'],			 // 可选。评论者相关属性的必填项。
      wordLimit: 200,					 // 可选。评论字数限制。
      imageUploader: false,				 // 可选。禁止上传图片
      search: false,					 // 可选。禁止搜索
    },
  }
3.9.9 评论邮件通知
在 Vercel 配置一些 Waline 服务端环境变量,当网站有用户发布评论或者用户回复评论时,支持对博主和回复评论作者进行通知。
SMTP_SERVICE: QQ
SMTP_USER: xxxx@qq.com
SMTP_PASS: xxxxxxxxxxxxx  # SMTP 邮件发送服务的密码,qq邮箱取授权码,不是邮箱密码
SMTP_SECURE: off
SITE_NAME: 凡心的博客
SITE_URL: https://www.fanxincc.top  # 注释:必须配置前缀 https://或http://,结尾不能有/,不然要修改邮件模板
AUTHOR_EMAIL: xxxx@qq.com
MAIL_SUBJECT: 您的评论收到了新回复(凡心的博客)
MAIL_TEMPLATE: # 注释:自定义评论回复邮件内容,默认的样式太丑
<div class=email-container><style>.email-container{font-family:'Century Gothic','Trebuchet MS','Hiragino Sans GB',微软雅黑,'Microsoft Yahei',Tahoma,Helvetica,Arial,SimSun,sans-serif;background-color:#f8f9fa;color:#333;max-width:600px;margin:auto;padding:20px;background-color:#fff;border-radius:5px;box-shadow:0 4px 8px rgba(0,0,0,.1)}.header{height:200px;background-image:url(https://images.wallpaperscraft.com/image/single/night_city_aerial_view_lights_city_134887_1280x720.jpg);background-size:cover;background-position:center}h1{margin-top:20px;font-size:1.5em;color:#525F7F;font-weight:700}.comment{padding:10px;background-color:#e9ecef;border-radius:5px;margin-bottom:10px}.reply{padding:10px;background-color:#dee2e6;border-radius:5px;margin-bottom:10px}p{color:#525F7F}a{color:#6D9886;text-decoration:none;transition:color .3s ease}a:hover{color:#5A8370}.note{font-size:.8em;color:grey;margin-top:20px;text-align:center}@media (max-width:600px){.email-container{padding:10px}}</style><div class=header></div><h1>您在『{{site.name | safe}}』上的留言有新回复啦!</h1><br><p>😊Hi,<strong>{{parent.nick}}</strong>,您曾在文章上发表评论:</p><div class=comment><pre>{{parent.comment | safe}}</pre></div><p><strong>{{self.nick}}</strong> 给您的回复如下:</p><div class=reply><pre>{{self.comment | safe}}</pre></div><p>您可以点击 <a href={{site.url}}{{self.url}} target=_blank style=text-decoration:none>查看回复的完整內容</a></p><p>欢迎再次光临 <a href={{site.url}} target=_blank style=text-decoration:none>{{site.name}}</a></p><hr><p class=note>本邮件为系统自动发送,请勿直接回复邮件,可到文章页面回复。<br><a href={{site.url}} target=_blank style=text-decoration:none>{{site.name}}</a></p></div>
MAIL_SUBJECT_ADMIN: 您的博客收到了新的评论(凡心的博客)
MAIL_TEMPLATE_ADMIN: # 注释:自定义新评论通知邮件内容,默认的样式太丑
<div class=email-container><style>.email-container{font-family:'Century Gothic','Trebuchet MS','Hiragino Sans GB',微软雅黑,'Microsoft Yahei',Tahoma,Helvetica,Arial,SimSun,sans-serif;background-color:#f8f9fa;color:#333;max-width:600px;margin:auto;padding:20px;background-color:#fff;border-radius:5px;box-shadow:0 4px 8px rgba(0,0,0,.1)}.header{height:200px;background-image:url(https://images.wallpaperscraft.com/image/single/night_city_aerial_view_lights_city_134887_1280x720.jpg);background-size:cover;background-position:center}h1{margin-top:20px;font-size:1.5em;color:#525F7F;font-weight:700}.comment{padding:10px;background-color:#e9ecef;border-radius:5px;margin-bottom:10px}.reply{padding:10px;background-color:#dee2e6;border-radius:5px;margin-bottom:10px}p{color:#525F7F}a{color:#6D9886;transition:color .3s ease}a:hover{color:#5A8370}.note{font-size:.8em;color:grey;margin-top:20px;text-align:center}@media (max-width:600px){.email-container{padding:10px}}</style><div class=header></div><h1>您收到了一条新的评论!</h1><br><p><strong>{{self.nick}}</strong> 评论:</p><div class=comment><pre>{{self.comment | safe}}</pre></div><p>您可以点击 <a href={{site.url}}{{self.url}} target=_blank style=text-decoration:none>查看评论的完整內容</a></p><p>欢迎再次光临 <a href={{site.url}} target=_blank style=text-decoration:none>{{site.name}}</a></p><hr><p class=note>本邮件为系统自动发送,请勿直接回复邮件,可到文章页面回复。<br><a href={{site.url}} target=_blank style=text-decoration:none>{{site.name}}</a></p></div>
默认邮件通知样式:
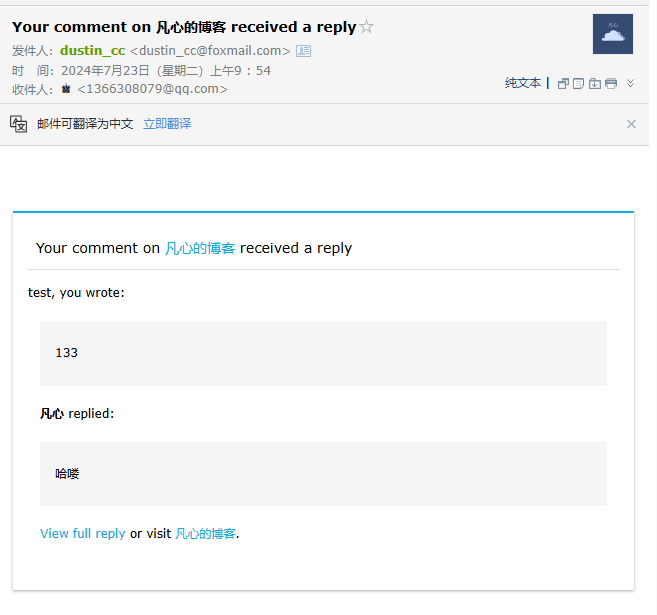
修改后的样式:
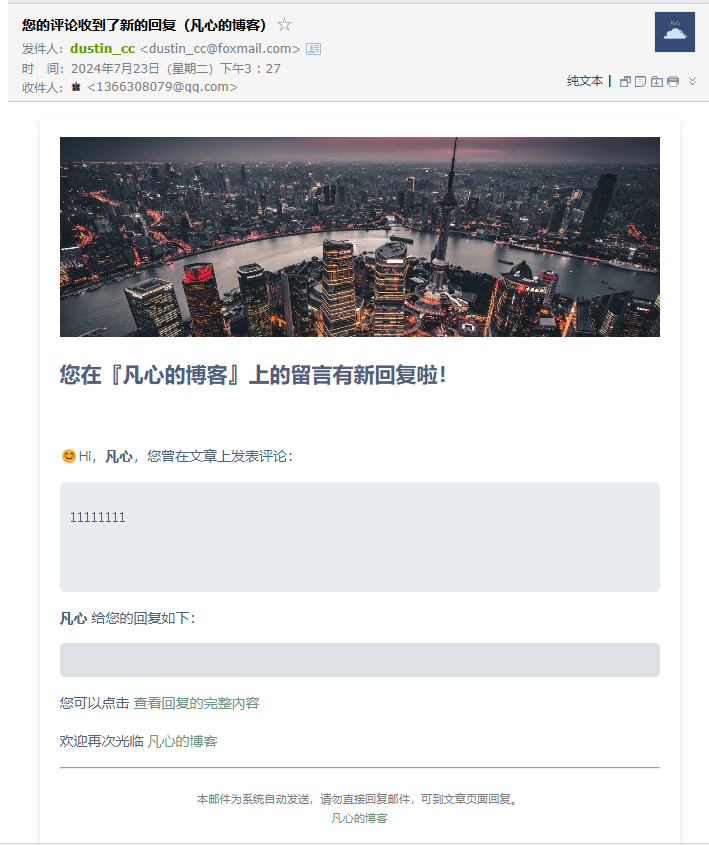
更改环境变量后记得重新部署 Vercel。
3.10 配置文章底部更新时间
在 .vuepress/theme.ts 文件的 plugins 配置中启用 git:
plugins: {
    git: true,
}
3.11 删除多余的文件
多余的文章、图片等静态资源
3.12 美化样式
3.12.1 建立样式文件和引用
在 .vuepress/styles/ 目录下新建两个文件:vars.scss 和 vars-dark.scss,分别作为亮色主题和暗色主题的样式。
在 .vuepress/styles/index.scss 文件中插入 2 个引用:
@use 'vars';
@use 'vars-dark';
3.12.2 美化 DocSearch 搜索
在 vars.scss 文件配置亮色主题:
// 亮色
/* DocSearch */
.DocSearch {
    --docsearch-container-background: rgba(9, 10, 17, 0.6);
    /* modal */
    --docsearch-modal-width: 60%;
    --docsearch-modal-height: 60%;
    --docsearch-searchbox-shadow: inset 0 0 0 1px var(--theme-color)
}
.DocSearch-Container .DocSearch-Form {
    border-radius: 6px;
}
.DocSearch-Container .DocSearch-Hit a {
    border-width: 1px;
    border-style: solid;
    border-color: rgba(200, 200, 200, 0.8);
    background-color: rgb(249 250 251);
    border-radius: 6px;
    box-shadow: unset;
}

.DocSearch-Container .DocSearch-Footer {
    box-shadow: unset;
    border-top: solid 1px #c8c8c852;
}

.DocSearch-Container .DocSearch-Commands-Key {
    --tw-shadow: 0 1px 3px 0 rgb(0 0 0 / .1), 0 1px 2px -1px rgb(0 0 0 / .1) !important;
    box-shadow: var(--tw-ring-offset-shadow, 0 0 #0000), var(--tw-ring-shadow, 0 0 #0000), var(--tw-shadow) !important;
    background: inherit;
    border-width: 1px;
    border-style: solid;
    border-color: #c8c8c852;
}
在 vars-dark.scss 文件配置暗色主题
// 暗色
/* DocSearch */
html[data-theme="dark"] .DocSearch-Hit-source {
    color: #fffff5db;
}

html[data-theme="dark"] .DocSearch-Hit a {
    border-color: #52525952;
    background: var(--docsearch-hit-background);
}

html[data-theme="dark"] .DocSearch-Hit-icon,
html[data-theme="dark"] .DocSearch-Hit-title,
html[data-theme="dark"] .DocSearch-Hit-Tree {
    color: #fffff5db;
}
html[data-theme="dark"] .DocSearch-Hit-path {
    color: #ebebf599;
}

html[data-theme="dark"] .DocSearch-Hit[aria-selected=true] .DocSearch-Hit-icon,
html[data-theme="dark"] .DocSearch-Hit[aria-selected=true] .DocSearch-Hit-title,
html[data-theme="dark"] .DocSearch-Hit[aria-selected=true] .DocSearch-Hit-Tree,
html[data-theme="dark"] .DocSearch-Hit[aria-selected=true] .DocSearch-Hit-path,
html[data-theme="dark"] .DocSearch-Hit[aria-selected=true] mark,
html[data-theme="dark"] .DocSearch-Hit[aria-selected=true] .DocSearch-Hit-Select-Icon {
    color: #ffffff !important;
}

html[data-theme=dark] .DocSearch-Hit[aria-selected=true] a{
    --tw-bg-opacity: 1;
    background-color: rgb(93 103 232 / var(--tw-bg-opacity));
    --tw-text-opacity: 1;
    color: rgb(255 255 255 / var(--tw-text-opacity));
}
3.12.3 文章页卡片样式优化
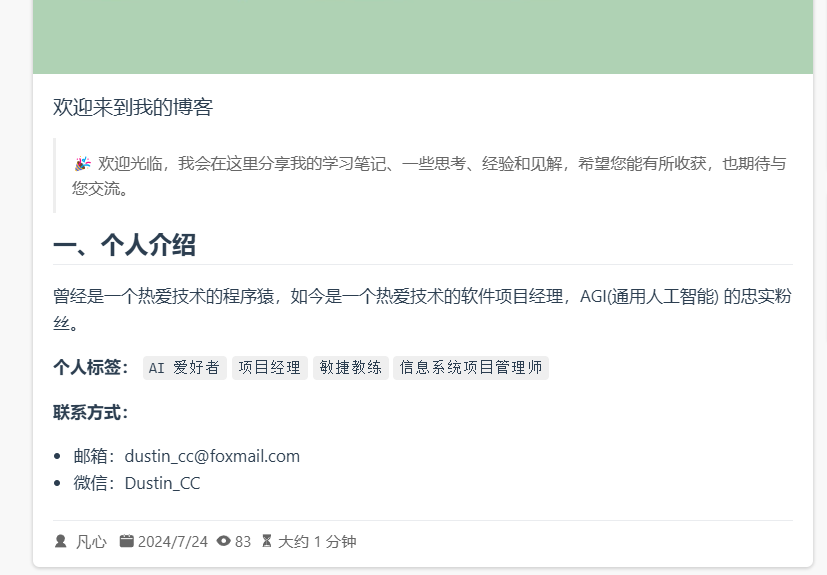
默认的文章页面卡片标题不是很明显,可能二级标题比一级标题还要突出,不利于点击进入页面详情。简单调整一下样式,使标题和文章内容对比明显。
修改前:
修改后:
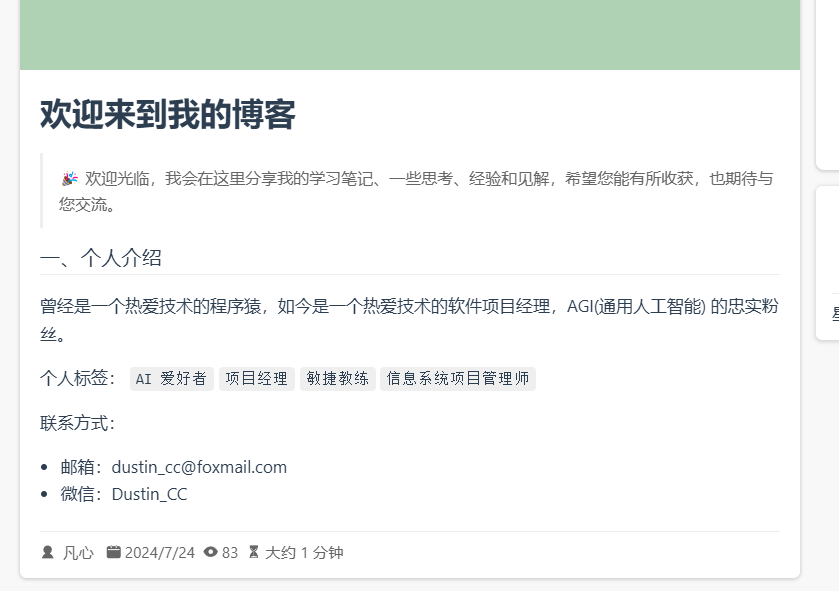
修改方案,在 index.scss 文件中插入以下代码:
// 主页文章标题加粗
.vp-article-title > span {
    font-size: 1.6em;
    font-weight: 600;
}
// 弱化主页文章内容
.vp-article-excerpt h2 {
    font-size: 1.2em;
    font-weight: 500;
}
.vp-article-excerpt strong {
    font-weight: 500;
}
3.13 谷歌分析统计网站访问量
3.13.1 创建谷歌分析账号
打开 谷歌分析官网 (墙)
点击 Start measuring,登录谷歌账号
Account creation
创建一个分析账号,填写账号名称,勾选所有选项,然后点击 Next
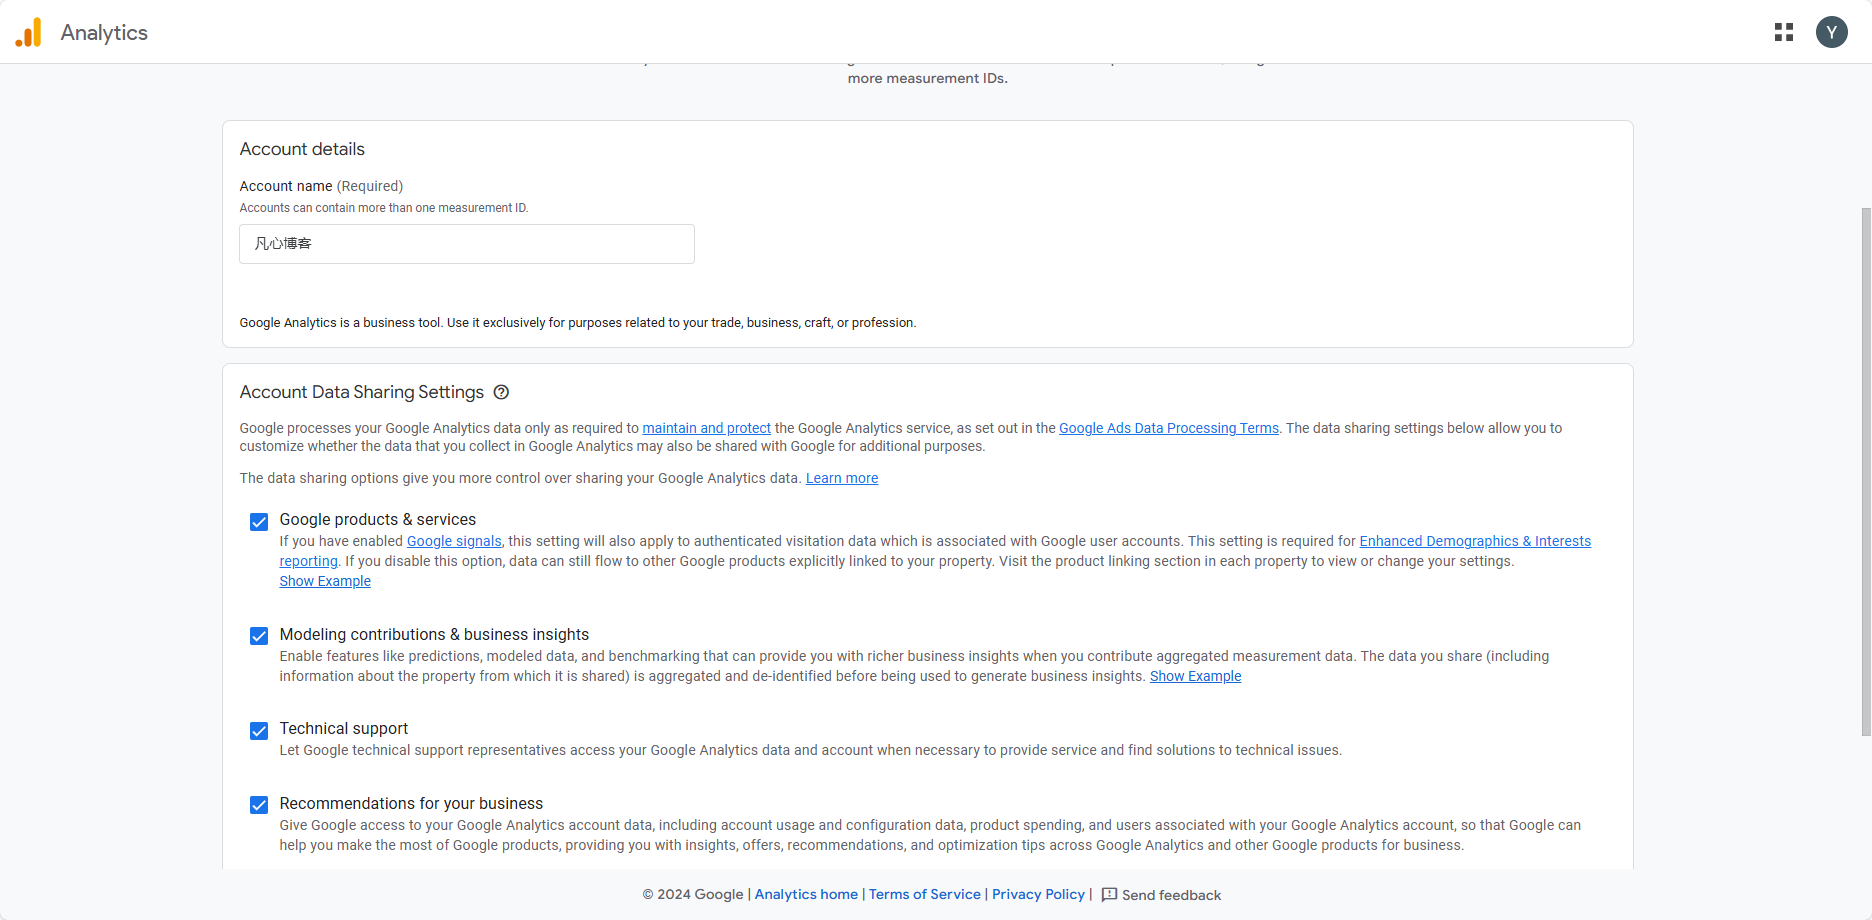
image Property creation
填写属性名称,随便填;然后选择时区为中国,币种为人民币
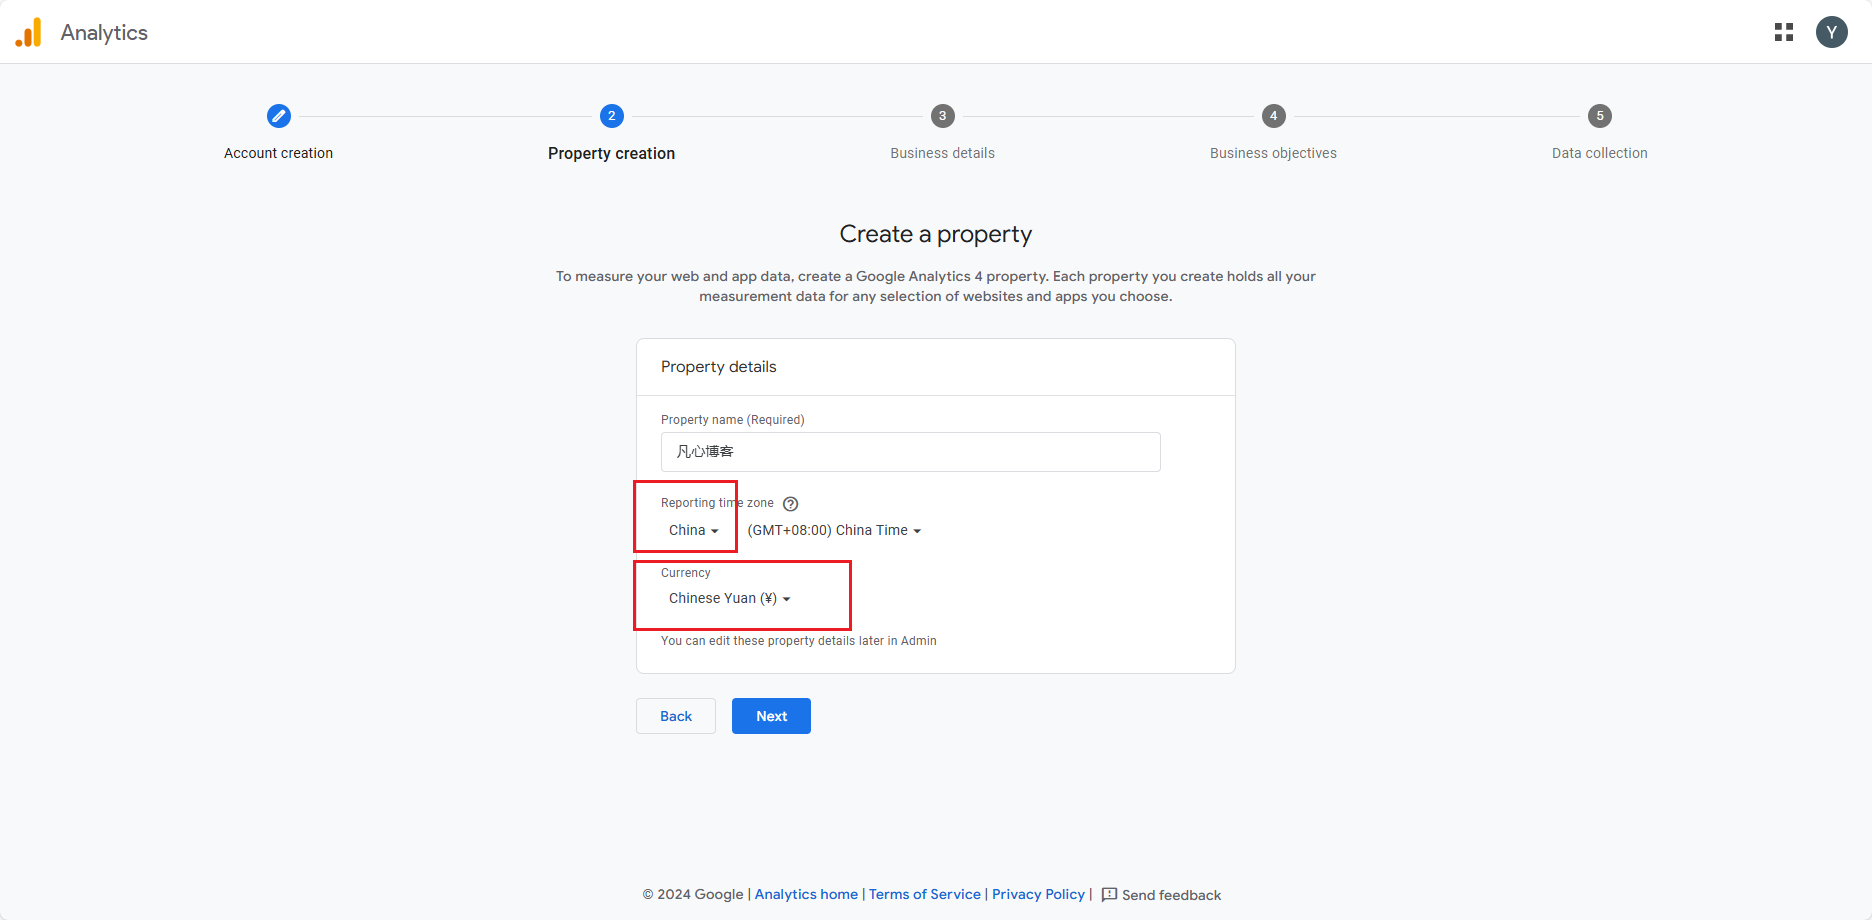
image Business details
选择行业类别和员工数量,随便选
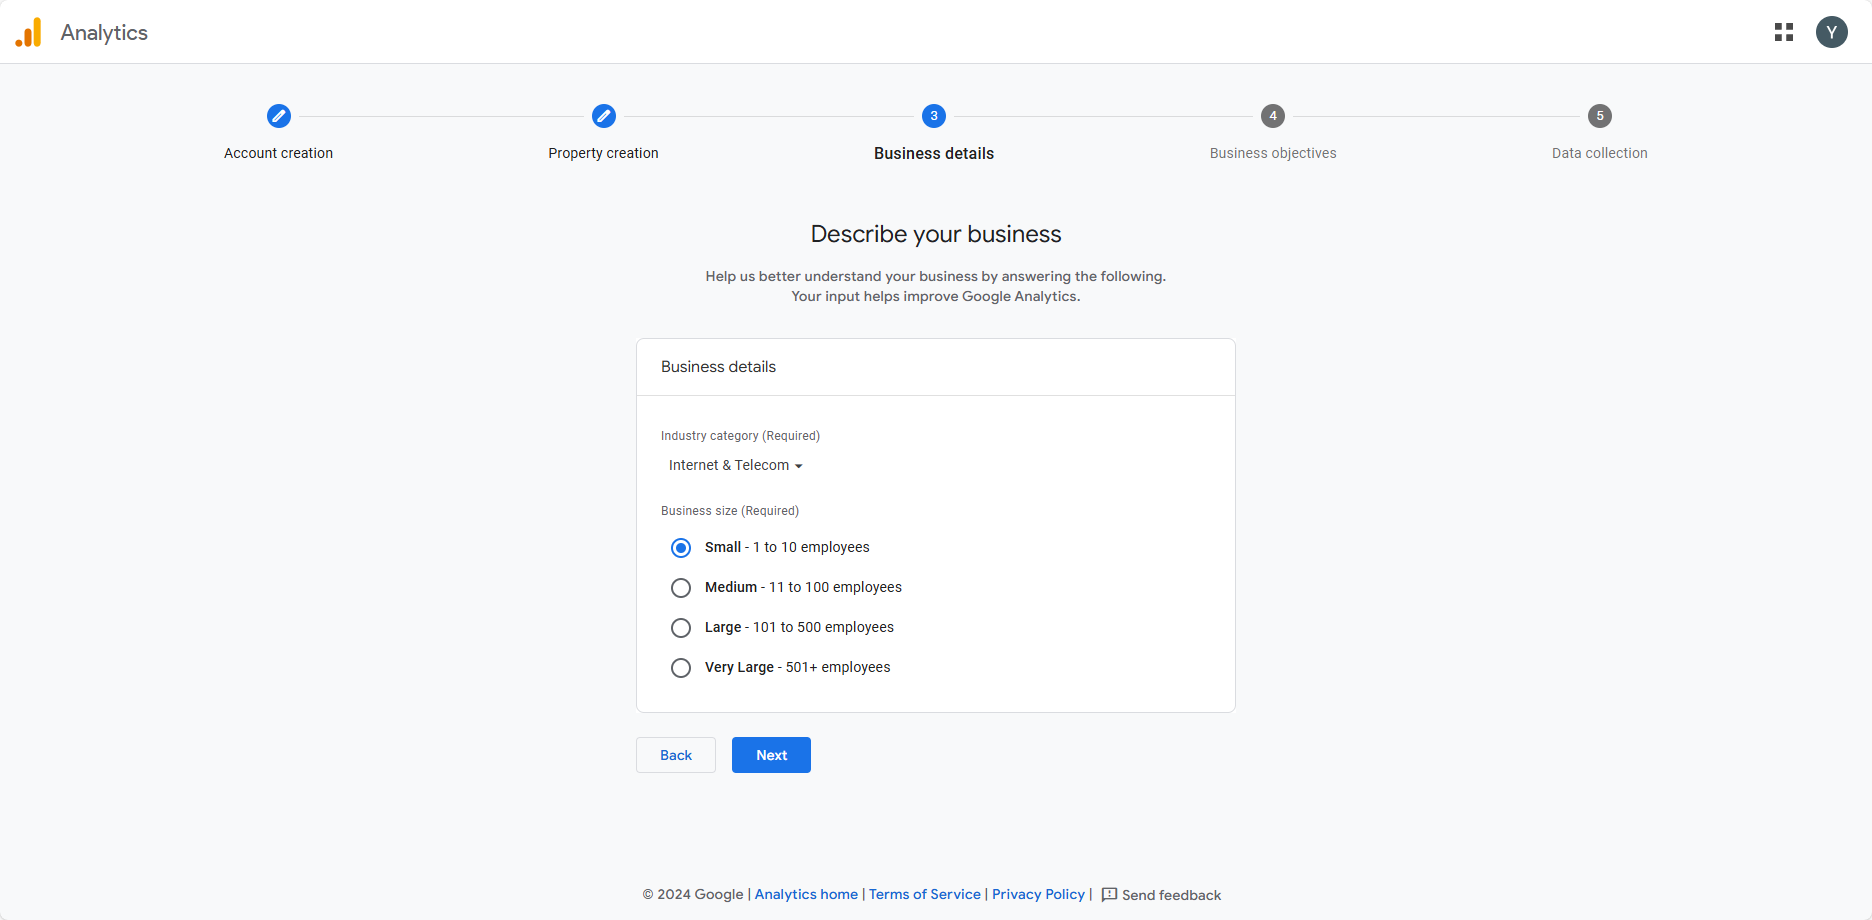
image Business objectives
勾选前 4 个
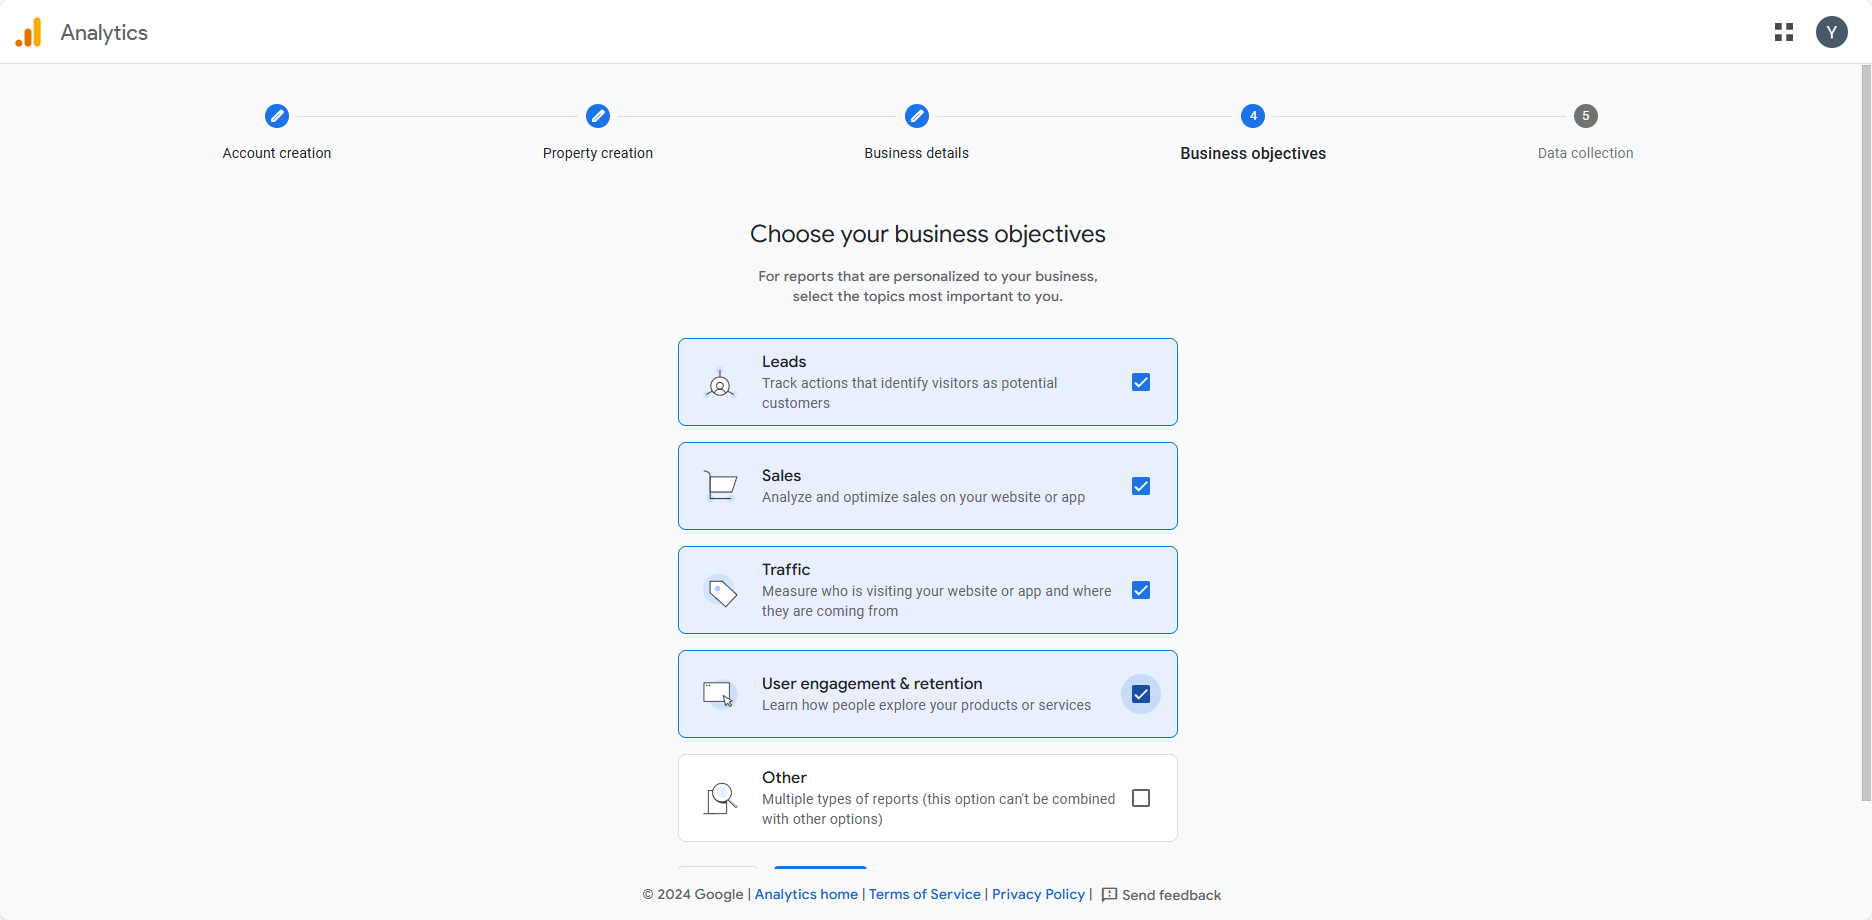
image 协议
选择地区为 China,勾选第一个 I also accept... , 完后拖动最右侧的滚动条到底部,勾选第二个 I accept...
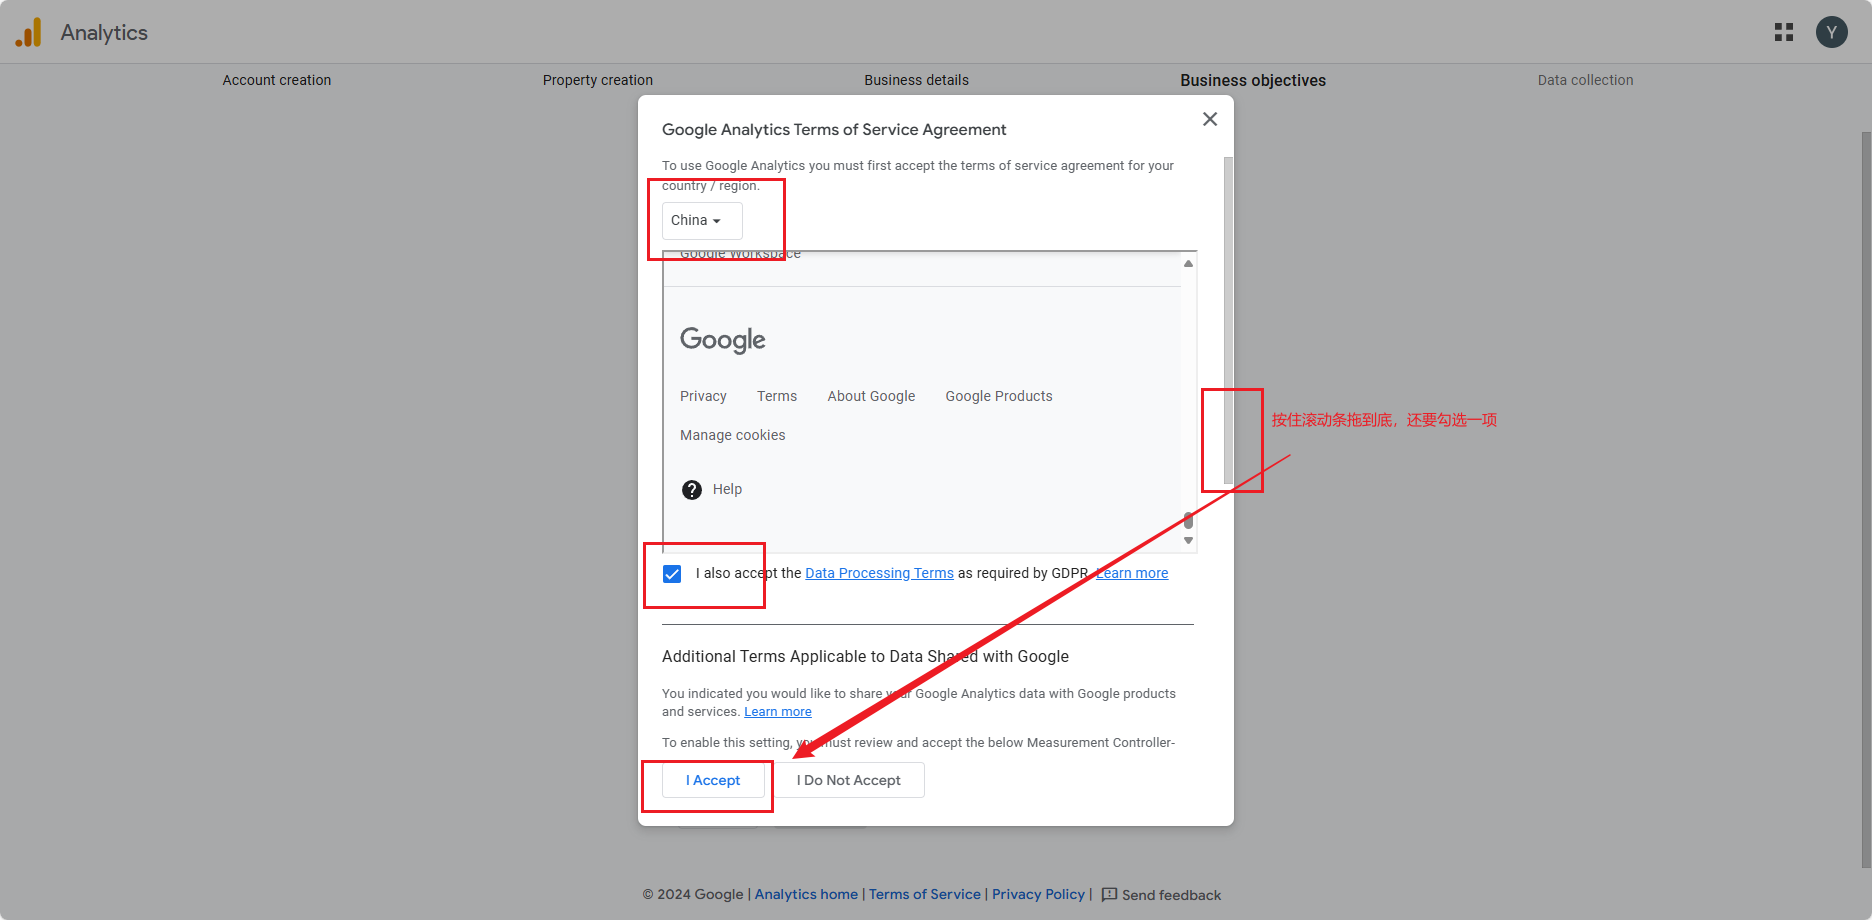
image Data collection
点击 Web,在右侧弹窗中填入网站地址和名称,然后点击 Create & continue
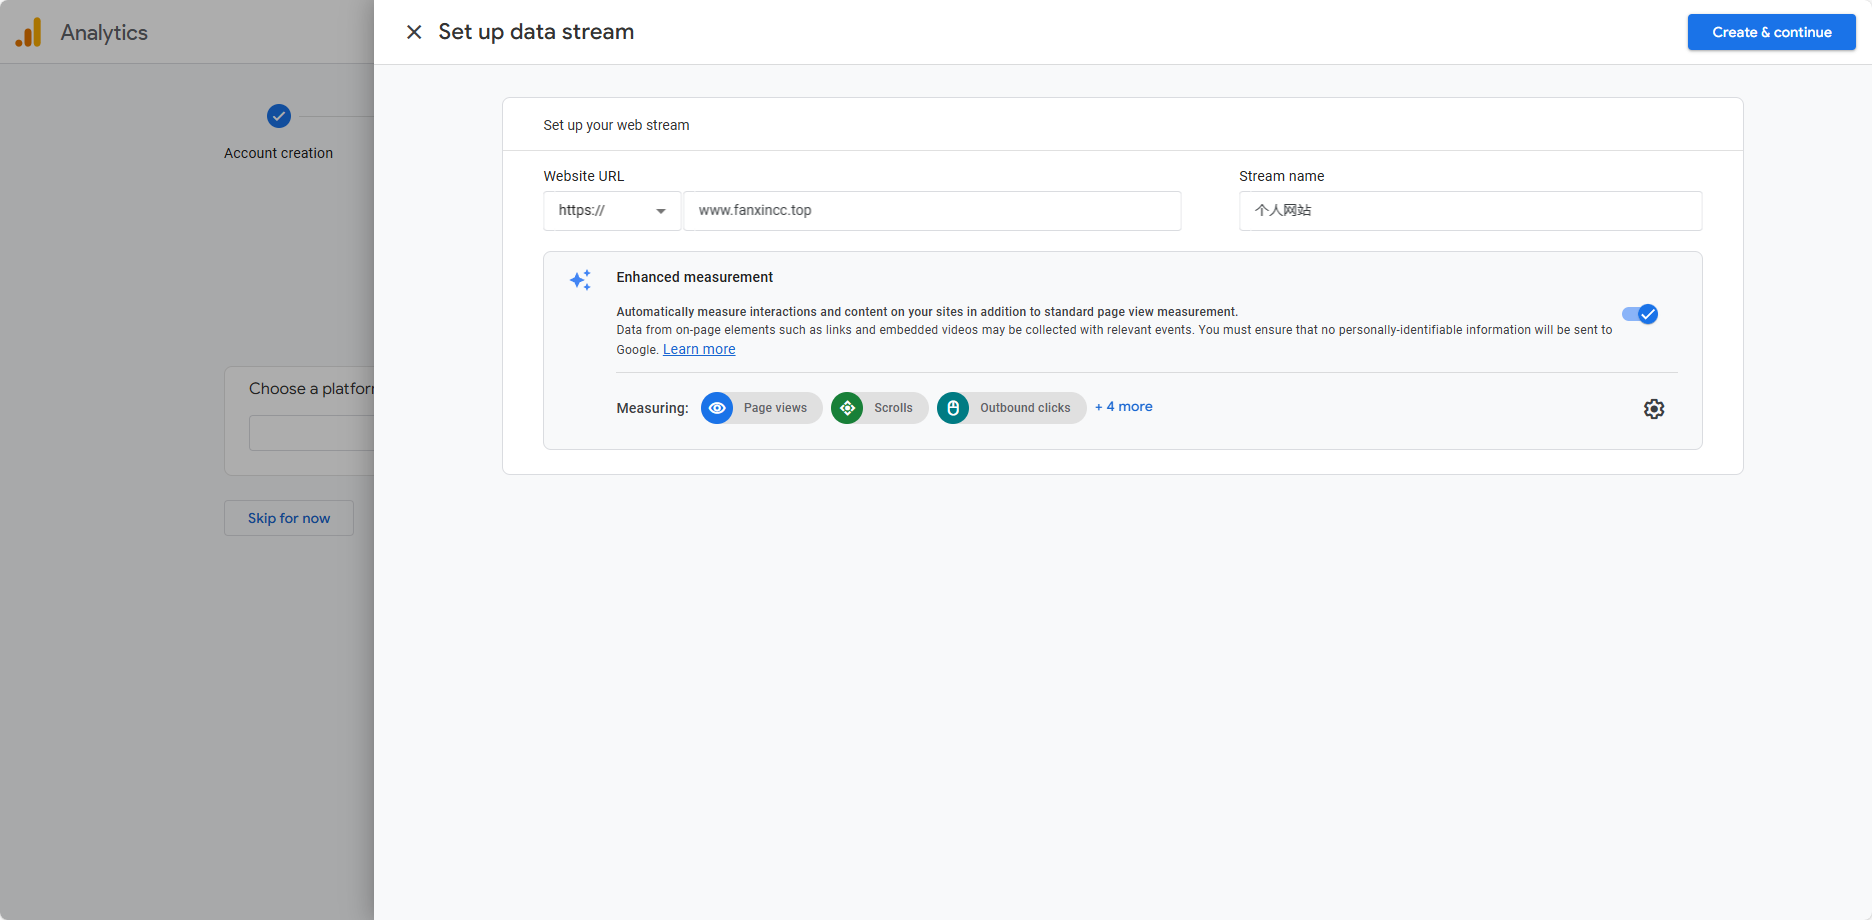
image 等待几秒钟侧面会弹出一个新窗口:Set up a Google tag,直接点击 × 关闭;
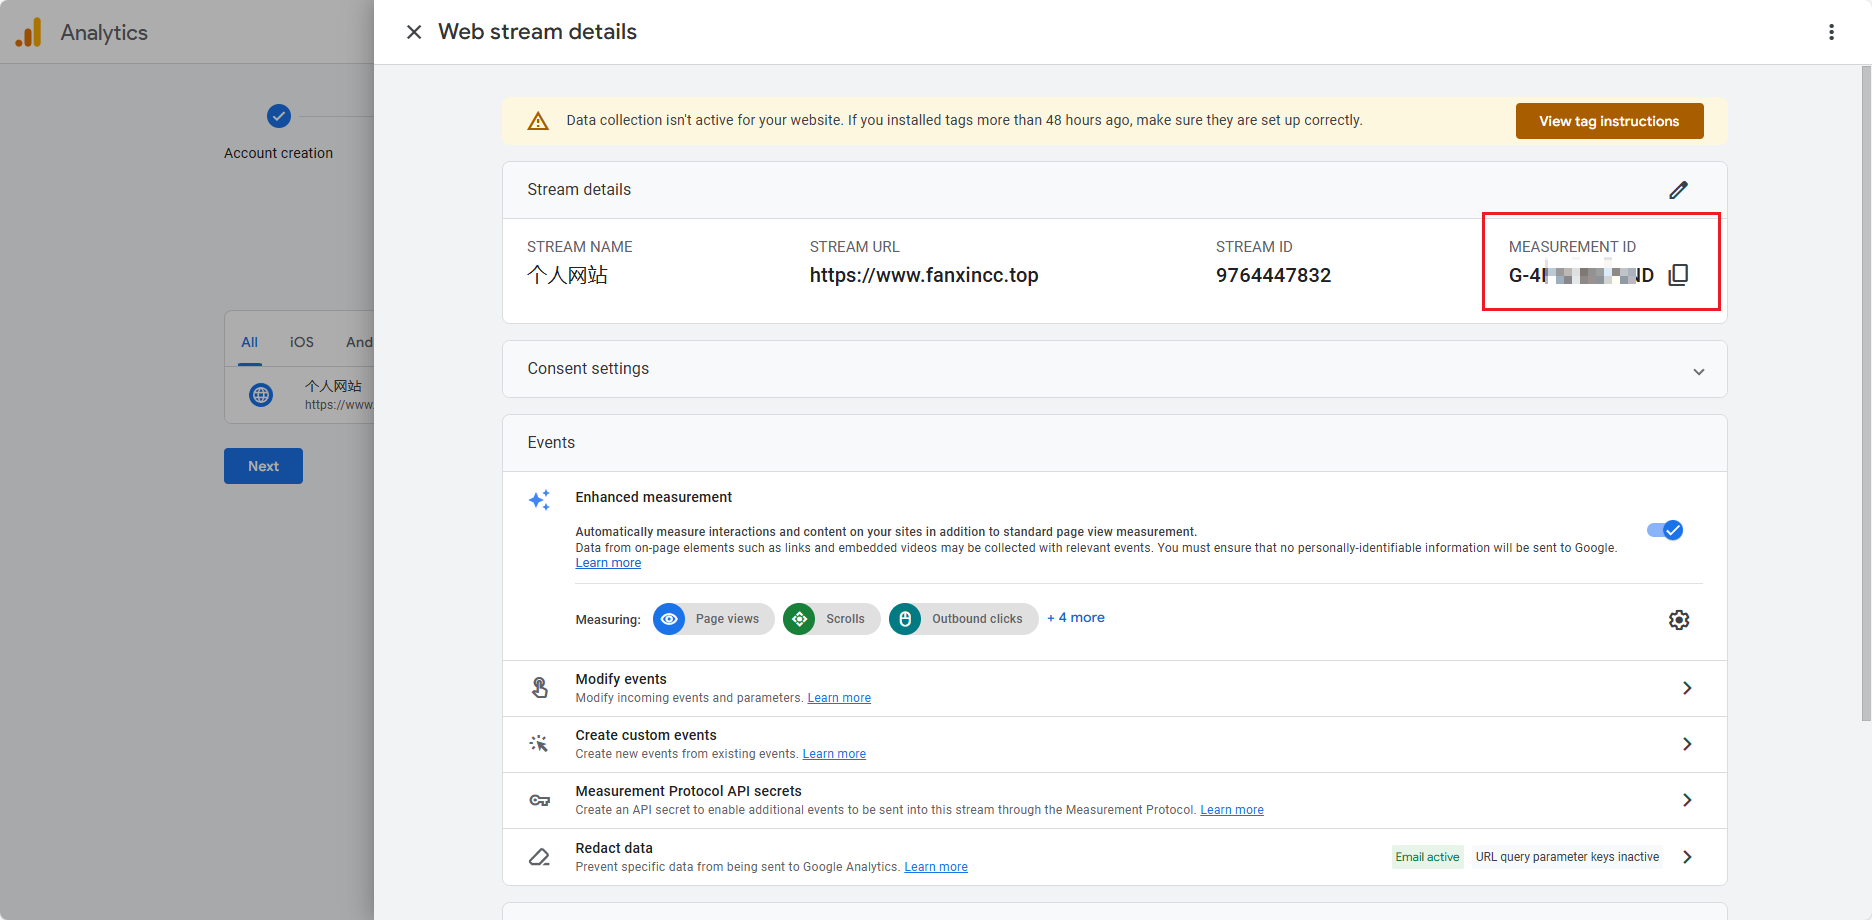
会弹出一个新窗口,复制窗口中的 Measurement Id
image
3.13.2 博客配置
执行命令安装插件:
pnpm add -D @vuepress/plugin-google-analytics@next在 config.ts 文件中插入以下代码
import { googleAnalyticsPlugin } from '@vuepress/plugin-google-analytics'

export default defineUserConfig({

  // more code...

  plugins: [
    googleAnalyticsPlugin({
      id: 'G-4D1G6DLEND',
    }),
  ],

  // more code...
});
提交代码并推送到远程仓库,等待 Vercel 部署成功后,即可查看实时报告(统计报告不会立刻有数据):
首页 - 报告 - 实时
标题深度配置(待办)
页面内右侧文章目录,只能显示到三级标题,无法显示更深层次的标题。
附:问题记录
打包报错 SyntaxError: Element is missing end tag.
原因:markdown 中有 < 被识别为 html 标签导致转义报错;
解决方案: < 符号使用代码块包裹起来。
